The complete gRPC guide part 2: Hands-on with JavaScript
Part 2 of 4 of the series The complete gRPC guide
We’ve reached the second part of our series on what gRPC is and how we can use it efficiently to replace what we use today with REST. In the first part of this series I gave the full explanation of how gRPC works internally and how it’s assembled in a standard HTTP/2 request with a binary payload using protobuf as the encoding layer.
In this part of the series, we’ll dive into how gRPC works for JavaScript. Let’s run through our agenda for today.
Agenda#
- What tools exist for gRPC in JavaScript these days
- How the client/server model works and what models are available for us to use
- Creating your first
.protofile - Advantages and disadvantages of static and dynamic models
- Time to code!
The tools we work with#
As mentioned by Russel Brown in his amazing series “The Weird World of gRPC Tooling for Node.js”, the protobuf documentation, especially for JavaScript, is still not fully documented, and this is a recurring topic. All of protobuf was built with a focus on working with several lower-level languages like Go and C++. For these languages, the documentation is very good, but when we get to JavaScript and TypeScript, we start to see a documentation problem where it’s either not fully complete or doesn’t exist at all.
Fortunately, this situation is changing a lot, largely thanks to Uber, which is working on amazing tools like Buf and also a series of best practices created in another amazing tool called Prototool.
For this article, we’ll stick with the traditional tools created by the gRPC team itself, and in a future article, we’ll explore this world even more with other support tools.
Proto Compiler, or protoc#
Our main tool for manipulating proto files, called protoc, is part of the same package as protocol buffers. We can think of it as the CLI for protobuf.
This is the main implementation of the code generator and protobuf parser in various languages, which are described in the repository README. There is a page with the main tutorials, but, as expected for us, it doesn’t cover JavaScript.
We can use protoc as a command line to convert our .proto contract definition files into a .pb.js file that contains the code necessary for us to serialize and deserialize our data in the binary format used by protobuf and send it over the HTTP/2 transport protocol.
In theory, we can create a manual request to a gRPC service using only an HTTP/2 client, knowing the route where we want to send our data and the necessary headers. Everything else in the payload can be identified as the binary representation of what protobuf produces at the end of compilation. We’ll see about this more in the future.
protobufjs#
It’s the alternative implementation of protoc made entirely in JavaScript. It’s great for dealing with protobuf files as messages, that is, if you’re using protobuf as a messaging system between queues, for example, as we already demonstrated in the previous article, it’s excellent for generating a more user-friendly implementation to use in JavaScript.
The problem is that it has no support for gRPC, meaning we can’t define services and RPCs on top of protobuf files, which makes this package, essentially, a message decoder.
@grpc/proto-loader#
It’s the missing piece for protobufjs to generate stub and skeleton definitions dynamically from .proto files. Today it’s the recommended implementation for what we’ll do in the rest of the article, which is the dynamic implementation of contract files without needing to pre-compile all proto files beforehand.
grpc and grpc-js#
The core that makes gRPC work inside dynamic languages like JS and TS. The original grpc package has two versions, one version implemented as a C library that is more commonly used when we’re writing either the client or the server in C or C++.
Important note: Since this article was published, the
grpclibrary has been marked for deprecation, so from now on, always use the maintained and newest version which is@grpc/grpc-js.
For our case, it’s ideal to use the implementation as an NPM package that, essentially, takes the C implementation we mentioned earlier, uses node-gyp to compile this extension as a native module of Node.js, so that all bindings between C and Node are done using the N-API that serves as the intermediary between C++ code and JavaScript code, allowing us to integrate JavaScript code with C++ code at runtime.
Currently, the NPM package for gRPC is the most widely used for creating gRPC clients, although, at the moment, many people are migrating to grpc-js, a completely JS implementation of the gRPC client.
The client/server model in gRPC#
The client and server model we have in gRPC is nothing more than standard HTTP/2 communication, the difference is the headers we’re sending. As I explained in the first part of the series, all communication via gRPC is, in fact, an HTTP/2 call with a binary payload encoded in base64.
To illustrate this communication, along with the code we’ll make here, I put a small example of a gRPC call using a tool called grpc-web that allows the browser to connect directly with a gRPC client, since the browser, despite supporting HTTP/2, doesn’t expose this setting so that application clients can make requests using the protocol.
The problem is that, due to stricter CORS rules and the lack of a server that allows me to change these options, the call was blocked from returning, but for what I want to show here (which is just the request) it will work.
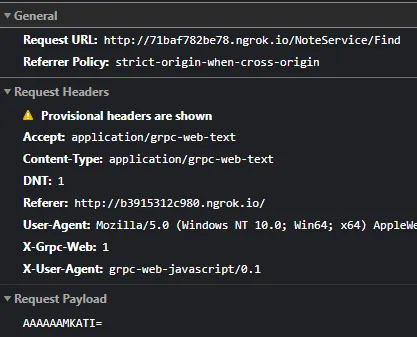
Notice that our request URL is /{service}/{method}, this is valid for anything we need to execute. Even if we have services with namespaces like, for example, com.lsantos.notes.v1 our URL will behave differently, being an expression of our full service, for example http://host:port/com.lsantos.notes.v1.NoteService/Find.
In this service we’ll create a notes system that has only two methods, List and Find. The List method takes no parameters, while Find takes an id parameter that we’re sending in the payload as we can see in the image. Notice that it’s encoded as base64 with the value AAAAAAMKATI=.
Inside the code repository, we have a file called request.bin, which is the result of echo "AAAAAAMKATI=" | base64 -d > request.bin. If we open this file with a Hex Editor (like the one we showed in the first article of the series, in VSCode), we’ll see the following bytes: 00 00 00 00 03 0A 01 32. We remove all the 00 and also the 03 since it’s just a marker for grpc-web encoding. In the end we’ll have 0A 01 32 and we can go through the same analysis model we did before in the other article of the series:
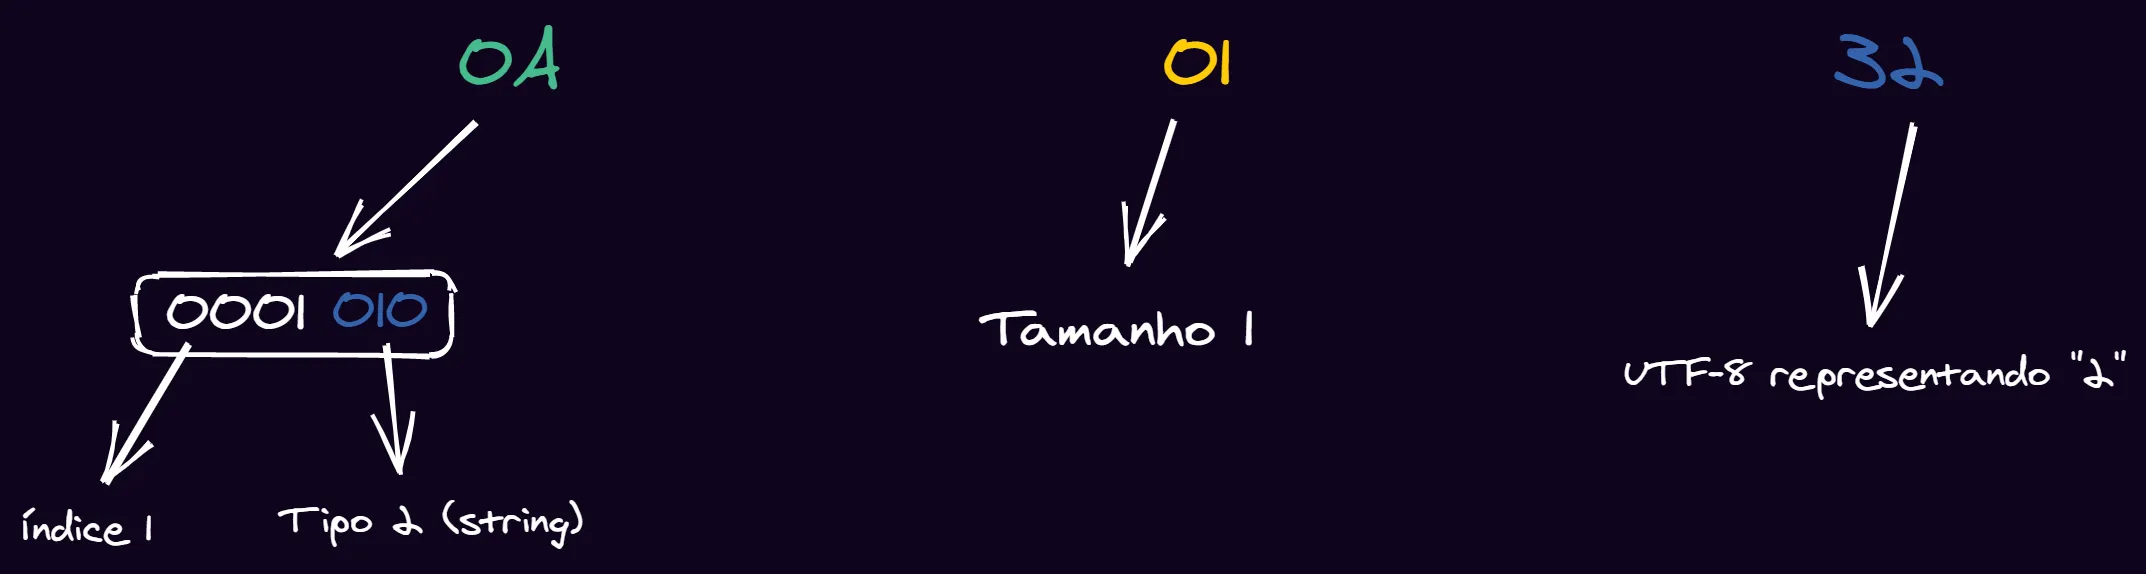
We can see that we’re sending a string with the value “2” as the payload, which is the first index.
Proto files#
Let’s get our hands dirty and develop our first .proto file that will describe how our entire API will work.
First, let’s create a new project in a folder with npm init -y. You can name it whatever you want. Next, we’ll install the dependencies we’ll need with npm i -D google-protobuf protobufjs.
Now let’s create a proto folder and inside it a file called notes.proto. This will be the file that describes our API and our entire service. We’ll always start by using a syntax notation:
syntax = "proto3";There are two versions of protobuf syntax, you can read more about these versions in this article. For us, the most important parts are that now all protobuf fields become optional, we no longer have the required notation that existed in version 2 of the syntax, and we also no longer have default values for properties (which essentially makes them optional).
Now, let’s start with organizing the file. I usually organize a protobuf file following the idea of Service -> Entities -> Requests -> Responses. According to Uber’s best practices, it’s also interesting to use a namespace marker like com.yourusername.notes.v1 if we need to maintain more than one version at the same time, but to make development easier here, we’ll use the simplest form without any namespace.
Protobuf also allows importing packages from other namespaces and reusing definitions across different files.
Let’s first define our service, or RPC, which is the specification of all the methods our API will accept:
syntax = "proto3";
service NoteService { rpc List (Void) returns (NoteListResponse); rpc Find (NoteFindRequest) returns (NoteFindResponse);}Some details are important when talking about services:
- Each
rpcis a route and, essentially, an action that can be performed on the API. - Each RPC can only receive one input parameter and one output parameter.
- The
Voidtype we defined can be replaced by the typegoogle.protobuf.Empty, which is called aWell-Knowntype, but it requires that the library with these types is installed on your machine. - Another Uber best practice is to put
RequestandResponsein your parameters, essentially creating a wrapper around a larger object.
Let’s define the entities we want. First, we’ll define the Void type, which is nothing more than an empty object:
syntax = "proto3";
service NoteService { rpc List (Void) returns (NoteListResponse); rpc Find (NoteFindRequest) returns (NoteFindResponse);}
// Entidadesmessage Void {}Each object type is defined with the message keyword. Think of each message as a JSON object. Our application is a list of notes, so let’s define the notes entity:
syntax = "proto3";
service NoteService { rpc List (Void) returns (NoteListResponse); rpc Find (NoteFindRequest) returns (NoteFindResponse);}
// Entidadesmessage Void {}
message Note { int32 id = 1; string title = 2; string description = 3;}Here we’re defining all our types for our main entity, the note itself. There are various scalar types in protobuf, as well as enumerators and other well-defined types in the language documentation.
Also note that we defined the message and its fields in the type name = index; model. We must pass the indices to the message, otherwise protobuf won’t know how to decode the binary.
Note that we changed our type definition a bit to no longer receive a string but an integer, different from what we did in grpc-web before. Can you figure out what binary is generated?
Now let’s specify the Request and Response types we created in our service definition at the beginning of the file. Let’s start with the simpler ones. The request for the Find method takes only an ID, so let’s specify the NoteFindRequest:
syntax = "proto3";
service NoteService { rpc List (Void) returns (NoteListResponse); rpc Find (NoteFindRequest) returns (NoteFindResponse);}
// Entidadesmessage Void {}
message Note { int32 id = 1; string title = 2; string description = 3;}
// Requestsmessage NoteFindRequest { int32 id = 1;}Now for the response from this same method, which should return a note if it’s found. To do this, we’ll create the NoteFindResponse and understand why this model is a best practice.
syntax = "proto3";
service NoteService { rpc List (Void) returns (NoteListResponse); rpc Find (NoteFindRequest) returns (NoteFindResponse);}
// Entidadesmessage Void {}
message Note { int32 id = 1; string title = 2; string description = 3;}
// Requestsmessage NoteFindRequest { int32 id = 1;}
// Responsesmessage NoteFindResponse { Note note = 1;}Why are we creating a response instead of directly using the Note type as a response? We could modify our service to receive Note as a response:
service NoteService { rpc List (Void) returns (NoteListResponse); rpc Find (NoteFindRequest) returns (Note);}The problem is that if we do this, we’ll have more difficulty retrieving these details directly from the client. As a best practice, it’s always good to wrap the response of some compound type (like Note) in an index of the same name. Essentially, our return changes from:
{ "id": 1, "title": "title", "description": "description"}To:
{ "note": { "id": 1, "title": "title", "description": "description" }}Isn’t that much more semantic?
Finally, let’s create the response for our listing service:
syntax = "proto3";
service NoteService { rpc List (Void) returns (NoteListResponse); rpc Find (NoteFindRequest) returns (NoteFindResponse);}
// Entidadesmessage Void {}
message Note { int32 id = 1; string title = 2; string description = 3;}
// Requestsmessage NoteFindRequest { int32 id = 1;}
// Responsesmessage NoteFindResponse { Note note = 1;}
message NoteListResponse { repeated Note notes = 1;}Here we have a new keyword, the repeated keyword. It identifies an array of the following type, in this case an array of Note.
This will be our contract definition file. Think that we can also use it if we had a queue service, for example, to encode a Note exactly as it’s used in other systems in binary form, and send it over the network without fear that the other side won’t understand what we’re sending. That is, we can standardize all inputs and outputs of all APIs of a large system with just declarative files.
Static or dynamic#
gRPC will always have two ways to be compiled. The first way is the static compilation model.
In this model, we run protoc to compile the files into .js files that contain the type definitions and encoding of our messages. The advantage of this model is that we can use the types as a library instead of reading them directly, but they’re much more complex to work with than if we simply tried to generate the package content dynamically.
I won’t go into detail about the static generation model in this article, but again Russel Brown has an excellent article about creating static services using gRPC.
What we’ll do is dynamic generation. In this model, we don’t have to manually encode and decode all messages. The dynamic model also better supports imported packages. However, like everything else, there’s a downside to using dynamic generation: we’ll always need to have the original sources, meaning we have to import and download the .proto files together with our project files. This can be a problem in some cases:
- When we have various interconnected systems, we need to have a central repository where we fetch all proto files from.
- Whenever we update a
.protofile, we have to identify this change and update all corresponding services.
These problems are easily solved with a package management system like NPM, but simpler. Besides, Buf itself, which we mentioned earlier, is already working to bring this functionality to protobuf.
Server#
To start creating the server, we’ll install the necessary gRPC packages, starting with grpc and proto-loader with the command npm i grpc @grpc/proto-loader.
Create a src folder and a server.js file. We’ll start by importing the packages and loading the protobuf definition inside the gRPC server:
const grpc = require('grpc')const protoLoader = require('@grpc/proto-loader')const path = require('path')
const protoObject = protoLoader.loadSync(path.resolve(__dirname, '../proto/notes.proto'))const NotesDefinition = grpc.loadPackageDefinition(protoObject)What we’re doing here is essentially the idea of what we discussed about dynamic generation. The proto file will be loaded into memory and parsed at runtime, not pre-compiled. First, the protoLoader loads an object from a .proto file. Think of it as an intermediate representation between the actual service and what you can manipulate with JavaScript.
Then we pass this interpretation to grpc, essentially generating a valid definition that we can use to create a service and, consequently, an API. Everything from here on is the specific implementation of our business logic. Let’s start by creating our “database”.
Since we want something simple, we’ll just create an object and an array of notes that will be manipulated by our functions:
const grpc = require('grpc')const protoLoader = require('@grpc/proto-loader')const path = require('path')
const protoObject = protoLoader.loadSync(path.resolve(__dirname, '../proto/notes.proto'))const NotesDefinition = grpc.loadPackageDefinition(protoObject)
const notes = [ { id: 1, title: 'Note 1', description: 'Content 1' }, { id: 2, title: 'Note 2', description: 'Content 2' }]Now let’s create and start our server by adding the service we just read from the .proto file:
const grpc = require('grpc')const protoLoader = require('@grpc/proto-loader')const path = require('path')
const protoObject = protoLoader.loadSync(path.resolve(__dirname, '../proto/notes.proto'))const NotesDefinition = grpc.loadPackageDefinition(protoObject)
const notes = [ { id: 1, title: 'Note 1', description: 'Content 1' }, { id: 2, title: 'Note 2', description: 'Content 2' }]
const server = new grpc.Server()server.addService(NotesDefinition.NoteService.service, { List, Find })
server.bind('0.0.0.0:50051', grpc.ServerCredentials.createInsecure())server.start()console.log('Listening')Notice that we’re adding the NotesDefinition.NoteService.service, which is a class that contains our HTTP server that will respond to the requests sent. After that, we’re sending an object {List, Find}, which are the implementations of our two methods that we still need to create.
Also, we’re listening on port 50051. This port can be any free one you have on your computer up to 65535. Although it’s good practice to choose ports above 50000 to keep a good distance from common ports like 8080, 443, 9090, 3000, and so on.
Finally, we’re using createInsecure because by default, HTTP/2 requires a digital certificate to start. We’re just passing an empty certificate so we don’t have to create one locally. If you’re going to put this service in production, you should use a new digital certificate for communications.
Implementation#
For our server to be running, we need to implement each of the RPCs we defined in it. In this case, we created an List RPC and a Find RPC. The implementation of them is simply a function that takes an error and a callback as a signature. However, they must have the same name as the RPCs.
Let’s learn with the simpler example, the implementation of the List method. What it does is always return the full list of notes.
function List (_, callback) { return callback(null, { notes })}Notice that we also have to follow the same response model. If we say in our proto file that we expect the return to be a list of Note inside an index called notes, we have to return an object { notes }.
The callback is a function we call in the callback (err, response) model, meaning if we have errors, we send them in the first parameter and the response as null, and vice versa.
To implement the Find method, we need to handle some errors and perform a find in our array. The method is pretty simple, but it takes an id parameter. To get this parameter, we use the first parameter of the function, which we ignored in List with _, to get a request object, inside which will be our id parameter sent:
function Find ({ request: { id } }, callback) { const note = notes.find((note) => note.id === id) if (!note) return callback(new Error('Not found'), null) return callback(null, { note })}It’s important to note that if we have an error inside gRPC and don’t return it as the first parameter (if we simply give a return or a throw), this will cause our client to not receive the correct information. That’s why we should create an error structure and return it in the callback.
Similarly, when we call the callback function at the end of execution, we’re passing the error as null, which indicates that everything went well, and we’re also sending a { note } object as specified by our NoteFindResponse.
The complete server file looks like this:
const grpc = require('grpc')const protoLoader = require('@grpc/proto-loader')const path = require('path')
const protoObject = protoLoader.loadSync(path.resolve(__dirname, '../proto/notes.proto'))const NotesDefinition = grpc.loadPackageDefinition(protoObject)
const notes = [ { id: 1, title: 'Note 1', description: 'Content 1' }, { id: 2, title: 'Note 2', description: 'Content 2' }]
function List (_, callback) { return callback(null, { notes })}
function Find ({ request: { id } }, callback) { const note = notes.find((note) => note.id === id) if (!note) return callback(new Error('Not found'), null) return callback(null, { note })}
const server = new grpc.Server()server.addService(NotesDefinition.NoteService.service, { List, Find })
server.bind('0.0.0.0:50051', grpc.ServerCredentials.createInsecure())server.start()console.log('Listening')Client#
The client is not much different. The first few lines are exactly the same as the server, after all we’re loading the same definition file. Let’s code it in the same src folder in a client.js file:
const grpc = require('@grpc/grpc-js')const protoLoader = require('@grpc/proto-loader')const path = require('path')
const protoObject = protoLoader.loadSync(path.resolve(__dirname, '../proto/notes.proto'))const NotesDefinition = grpc.loadPackageDefinition(protoObject)Here I’m using the @grpc/grpc-js package for explanation purposes. The big difference between it and the original grpc package, besides the implementation, is that it doesn’t have a bind method for the server, so you need to use bindAsync (if you want to use it to make the server too). On the client, you can replace it with the grpc package just as easily as on the server. If you want to follow this tutorial and use both, then install grpc-js with the command npm i @grpc/grpc-js.
The big difference between the server and the client is that on the client, instead of loading the entire service to run a server, we just load the notes service definition. After all, we only need the network call and what it will respond with.
const grpc = require('@grpc/grpc-js')const protoLoader = require('@grpc/proto-loader')const path = require('path')
const protoObject = protoLoader.loadSync(path.resolve(__dirname, '../proto/notes.proto'))const NotesDefinition = grpc.loadPackageDefinition(protoObject)
const client = new NotesDefinition.NoteService('localhost:50051', grpc.credentials.createInsecure())Notice that we’re initializing a new instance of NoteService and not adding a NoteService.service. Still, we have to pass the same server address for us to have a successful communication.
From here on, we already have everything we need. Our client has all the methods defined in our RPC and we can call it as if it were a local object call:
const grpc = require('@grpc/grpc-js')const protoLoader = require('@grpc/proto-loader')const path = require('path')
const protoObject = protoLoader.loadSync(path.resolve(__dirname, '../proto/notes.proto'))const NotesDefinition = grpc.loadPackageDefinition(protoObject)
const client = new NotesDefinition.NoteService('localhost:50051', grpc.credentials.createInsecure())
client.list({}, (err, notes) => { if (err) throw err console.log(notes)})This call will cause the server to send us the list of notes, just as calling the Find endpoint will perform the search for notes:
const grpc = require('@grpc/grpc-js')const protoLoader = require('@grpc/proto-loader')const path = require('path')
const protoObject = protoLoader.loadSync(path.resolve(__dirname, '../proto/notes.proto'))const NotesDefinition = grpc.loadPackageDefinition(protoObject)
const client = new NotesDefinition.NoteService('localhost:50051', grpc.credentials.createInsecure())
client.list({}, (err, notes) => { if (err) throw err console.log(notes)})
client.find({ id: 2 }, (err, { note }) => { if (err) return console.error(err.details) if (!note) return console.error('Not Found') return console.log(note)})Notice that on the client, the function calls are in lowercase letters, but both versions exist within the same object.
We’re already handling the error of there being no note with the provided ID, as well as sending the { id: 2 } parameter as specified in our NoteFindRequest.
Going further#
Working with callbacks is kind of rough, so we can convert the calls to a more modern format with async like this:
function callAsync (client, method, parameters) { return new Promise((resolve, reject) => { client[method](parameters, (err, response) => { if (err) reject(err) resolve(response) }) })}And call your client like this:
callAsync(client, 'list', {}).then(console.log).catch(console.error)Another possibility is to also return all methods as asynchronous functions, essentially making the entire client asynchronous. We can take all the enumerable properties of the object and, for each one, create a {property}Async variant:
function promisify (client) { for (let method in client) { client[`${method}Async`] = (parameters) => { return new Promise((resolve, reject) => { client[method](parameters, (err, response) => { if (err) reject(err) resolve(response) }) }) } }}And modify our file to be like this:
const client = new NotesDefinition.NoteService('localhost:50051', grpc.credentials.createInsecure())promisify(client)
client.listAsync({}).then(console.log)As output, we’ll have our Note object.
Conclusion#
We’ve reached the end of our second article in the series. Here we discussed how we can create our gRPC service using JavaScript, discovered how we can transform it into something asynchronous, and also better understood the concepts and tools behind developing a gRPC application using JavaScript.
In the next article, we’ll improve this application even more by bringing in TypeScript types!
If you enjoyed this post, share it with your friends. If you don’t want to miss the next releases and tips, subscribe to the newsletter!
See you!
Footnotes#
-
If you want to know more about the integration of Node with C++ and how everything works under the hood, I have a 10-part series on Node.js internals that I recommend reading. ↩
-
If you want to know a little more about how it works, this article by Mark Kose has a good overview of how this type of communication can be done. ↩
-
See the
compilescript inside the package file in this project’s repository to understand how we can compile the files and what they look like after compilation. ↩