Integrating Azure Active Directory into AKS
We’ve already gone through articles on how to create users and also how to assign permissions to these users using RBAC. But using Kubernetes to handle user management, while simple, isn’t very practical precisely because of the distributed nature of clusters.
When we create a cluster, there are two security best practices we should consider. The first is the control you have over Azure’s own resources, like the cluster itself and every object inside its resource group. The other best practice is the control over what your users can do and see inside that cluster.
Azure AD#
An excellent option, probably the best one for AKS, to centralize user management is what’s called Azure Active Directory (AAD). Essentially this is an integration with Azure’s native Active Directory, centralizing control.
Using this option can be one of the best practices because we have full control over both the users and their roles and bindings in the same place, the Azure portal.
AAD kicks in whenever the user requests the configuration file through the az aks get-credentials command. When that happens, there are two main roles that get sent back:
- Administrative role: Full access to all resources
- User role: Restricted access to resources
When we have the AAD integration enabled, during the first configuration download, the user will have to log into the portal, and from there the corresponding profile will be downloaded.
How it works#
To better understand how AAD works, the ideal thing is to understand the full flow of how an active directory integration works in itself.
According to Microsoft’s own documentation, the AAD integration gives users and groups access to the cluster resources regardless of whether they’re in a namespace or not.
When a user logs in and downloads the kubeconfig file with the command we saw earlier, the first step of the flow is to ask the user to authenticate in the portal.
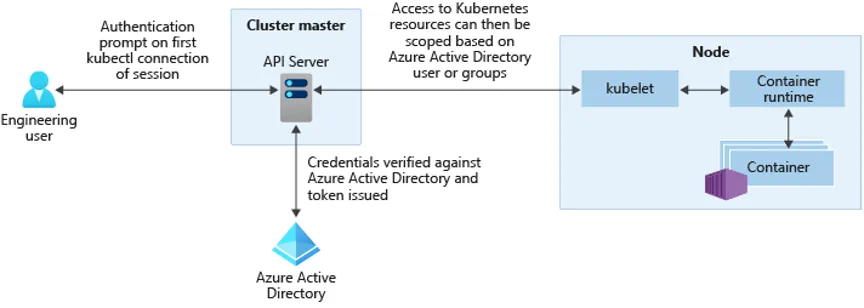
After authenticating in the portal, the cluster checks with Azure’s AD server whether the user exists and asks for an access token for them. This token is used to fill in the kubeconfig file.
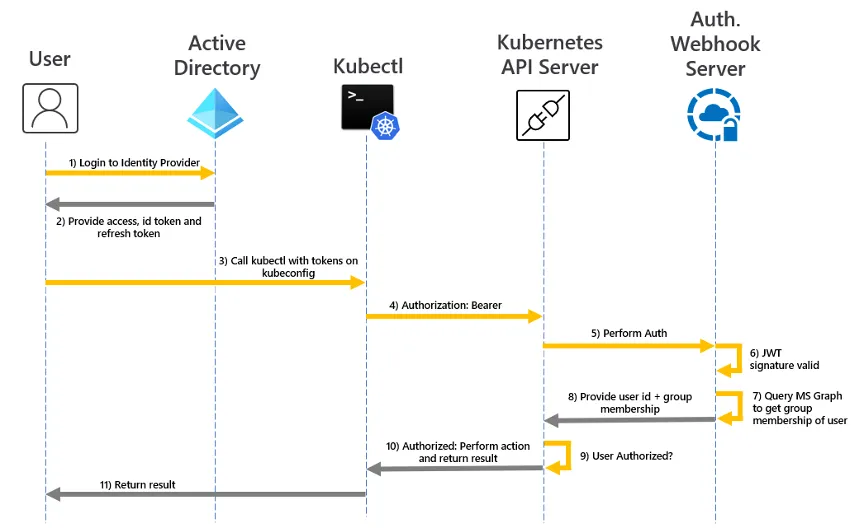
After downloading the config file, the user won’t have the permissions directly in the token, but will be integrated into the AAD webhook and the API server. Whenever the user runs any command in Kubectl, a call interceptor will use this token to validate the user against Azure’s servers and check whether they have permission to run the command.
If both the JWT token and the result of the query to the MS Graph API show that the user exists and has permission, then the call proceeds to the Kubernetes API, which uses its own Roles and Bindings to check whether the user has access.
The full flow would look something like this:
Integrating your cluster with AAD#
Before June 2020, we had to create all the stages of a standard AD server, which included creating a server application and a client inside the portal to integrate with the AAD application.
Now everything got much simpler with the arrival of Azure Managed AAD Integration (Managed AAD). Which, basically, abstracts away all the commands you’d have to run.
As much simpler as it is, this convenience comes with some limitations
The first step to enable Managed AAD on your cluster is installing the two most famous tools, kubectl and kubelogin. Luckily both can be installed using the az aks install-cli command.
We’ll need an initial group and user so we can have administrative privileges for the cluster’s first user, so we can use an existing group or create a new one with the following command:
az ad group create --display-name AKSAdminGroup --mail-nickname AKSAdminGroupThat returns a bunch of information, but the most important part of it is the ObjectID. Copy that and keep it, because we’re going to need it to add ourselves to the group. But for that we’re going to need to find out our own ID:
az ad user show --id email@delogin.com --query objectId -o tsvThe information that comes back is your user ID. Keep it so we can add ourselves to the group. But we have a problem: the login email isn’t the same email AD might be using, so we need to find that email. For that we’re going to use the user listing command:
az ad user list --query "[*].{name: displayName, id: userPrincipalName, objectId: objectId}" -o jsonThat returns a list of all users and their login IDs. You can then filter them through the --id key or just copy the ObjectID, because that’s all you need to add yourself to the group. So let’s do that:
az ad group member add --group AKSAdminGroup --member-id seuobjectidNow we have our user inside the general permission group, let’s create our enabled cluster:
az aks create \ -g aks-aad \ -n aad-cluster \ --enable-aad \ --aad-admin-group-object-ids objectIdDoGrupoAdminWe grab the credentials with az aks get-credentials -g aks-aad -n aad-cluster. Now that we have the configuration file, try running any command in kubectl, like kubectl get nodes, and you’ll see you get a message asking you to log into the portal.
AAD is already working, and always starting from the Zero Trust principle, you’ll never have any permission, only the ones you add.
Adding new users and groups#
Now that we have all the permissions, let’s add new users and groups just like we did in the other articles. First we need our AKS cluster’s ID:
AKSID=$(az aks show -g aks-aad -n aad-cluster --query id -o tsv)Now let’s create a read-only group called AKSReadOnlyGroup and save the ObjectID:
GROUPID=$(az ad group create \ --display-name AKSReadOnlyGroup \ --mail-nickname \ --query objectId -o tsv)These users need to log in as users and not as administrators. That can be done by adding this group to an existing role in AD called “Azure Kubernetes Service Cluster User Role”. As we saw earlier, that will make the users log in as users and not as administrators.
The object that ties a group to a role in Azure is called a Role Assignment. Let’s create one so we can link the two:
az role assignment create \ --assignee $GROUPID \ --role "Azure Kubernetes Service Cluster User Role" \ --scope $AKSIDLet’s add a new user called Alice to this group we just created, and copy the ObjectID when we create them:
ALICE=$(az ad user create \ --display-name "Alice Doe" \ --user-principal-name alice@dominio.com \ --password S3gr3d0 \ --query objectid -o tsv)We add the user to the group:
az ad group member add --group AKSReadOnlyGroup --member-id $ALICENow that we have the user created in AD, let’s create their role and binding in Kubernetes. As we saw earlier, AAD and Kubernetes RBAC work together to provide the complete authentication solution.
Inside Kubernetes#
First let’s create the role called ReadOnlyRole:
kubectl create clusterrole ReadOnlyRole --verb=get,list,watch --resource="*"Now let’s create the binding of this role to our AD group ID:
kubectl create clusterrolebinding ReadOnlyBinding \ --clusterrole=ReadOnlyRole \ --group=$GROUPIDNow we can test these roles by downloading the configuration file again and overwriting the current one:
az aks get-credentials -g aks-aad -n aad-cluster --overwrite-existingOn the first call, you’ll need to log in again with email and password. Let’s use Alice’s email to do that (the email you used when you created Alice’s user), along with the password you set.
After a successful login, try listing the pods in the kube-system namespace. You’ll be able to, because Alice’s user has permission to list all pods in all namespaces, but if you try to create anything, like:
kubectl run nginx-dev --image nginx --namespace defaultYou’ll get a “forbidden” message.
Conclusion#
We learned how we can use even more of Azure’s power to integrate authentication and more conveniences into our AKS cluster. With this kind of integration we can make our cluster even more secure.
See you!