Everything you need to know about Node.js's new test runner
As I’ve mentioned in another article, Node.js 18 came with lots of new features, including global availability of the fetch command and the start of adopting the node: prefix for importing system modules, which, by the way, we’ll need to use to discuss another addition: the native test runner.
What is a test runner#
Before I start, I want to give a brief introduction to what a test runner is and why it’s so necessary in practically any development environment.
Any code can be tested automatically, which means creating another portion of code (which ironically is not tested) that contains a call to the original function and stores the result of that call to be compared with a success or error output depending on the test case being tested.
The libraries for making assertions (testing if a result is what’s expected) are already native with Node.js’s assert module, so we could have a file like this:
const add = (a, b) => a + bexport { add }And test this simple function using the assert module:
import { add } from './function.mjs'import assert from 'node:assert'
let result = add(1, 2)assert.equal(result, 3, 'add(1, 2) should return 3')
result = add(1, '2')assert.equal(result, 3, 'add(1, "2") should not return 3')To execute it’s as simple as node addTest.mjs, however what would happen if we had hundreds or thousands of tests? Would we keep executing the same file? Split it into several? How would we handle the growth and automation of the codebase?
And that’s where test runners come in. Their job is to orchestrate test executions so they’re as efficient as possible and, at the same time, informative. Providing data such as code coverage and internal errors.
Why a test runner?#
Tools like Mocha, Jest, Jasmine, and Ava are already very well-known in the market, having existed for, well, forever, so why would Node’s test runner make any difference? We already have great tools out there.
The answer is simple: standardization. One of the biggest problems, at least in my opinion, is that all these tools behave in different ways and have different APIs (if they didn’t, we wouldn’t have different tools), and this increasingly reduces the number of people who run automated tests in their code.
Not writing tests leads to a greater number of untested systems that are susceptible both to security failures (in the worst case) and to critical system failures, and many critical systems lack tests.
With native ecosystem tools instead of third-party tools, we lower the barrier to entry for developers writing tests natively and standardize the API so other tools can be interchangeable.
The node:test#
The test module is the solution to the problem I just mentioned, it’s available starting from Node.js version 18, although you need to install version 18.1.0 to run the tool successfully from the command line (don’t ask me why).
Despite being present in the LTS version, the state of the test API is still described as experimental, meaning the API has near-final compatibility with the rest of the system, but it’s possible that future versions will undergo some changes or even have commands removed, so it’s still not recommended for production environments.
Using node:test#
Starting with the import, we’ll already see a big difference. We need to import the module with the node: prefix. If the test module is not imported following the prefix, Node will try to load a local module called test.
At the moment only this module has this requirement, but I believe this is part of a long-term plan to convert all native modules to the
node:prefix.
The most common lines will be:
import test from 'node:test'The module will export a function called test (which we could very well call whatever we wanted, the most common being describe). The function has the following signature:
type Options = { concurrency: number, only: boolean, skip: boolean | string, todo: boolean | string}
type test = (name: string, options?: Options | Function, fn: Function) => Promise<any>name: the name of the test, this is where you’ll describe what the test is testingoptions: An optional options object; if not passed, the second argument will be the test function to be executedconcurrency: The number of tests that can be executed at the same time within this scope; if not specified, subtests will inherit from the closest parentonly: Iftrue, when the CLI is run in--onlymode this test will be executed, otherwise it will be skippedskip: By default it’sfalse; iftrueor a string, the test will be skipped (with the string being the reason)todo: Same asskipbut the test is marked as to-do, or to be done.
fn: The function to be executed as a test; it’s only the third parameter if there’s an options object. It can be a synchronous or asynchronous function.
A test can have 3 types:
- Synchronous: a synchronous function that will fail the test if there’s a
throw
test('teste síncrono passando', (context) => { // Não lança exceções, portanto o teste passa assert.strictEqual(1, 1);});
test('teste síncrono falhando', (context) => { // Lança uma exceção e gera uma falha assert.strictEqual(1, 2);});- Asynchronous with Promises: An asynchronous function in the form of a Promise that will fail if the promise is rejected
test('assíncrono passando', async (context) => { // Sem exceções, a Promise resolve, sucesso! assert.strictEqual(1, 1);});
test('assíncrono falhando', async (context) => { // Qualquer exceção faz a promise rejeitar, portanto: erro assert.strictEqual(1, 2);});
test('falhando manualmente', (context) => { return new Promise((resolve, reject) => { setImmediate(() => { reject(new Error('podemos falhar a promise diretamente também')); }); });});- Asynchronous with Callbacks: Same as above, but the test function receives a second callback parameter (usually called
done) that, if executed with no parameters, makes the test succeed; otherwise the first parameter is the error.
test('callback passando', (context, done) => { // Done() é a função de callback, sem parâmetros, ela passa! setImmediate(done);});
test('callback falhando', (context, done) => { // Done é invocado com um parâmetro de erro setImmediate(() => { done(new Error('Mensagem de erro do teste')); });});To get closer to what we already use today, as I mentioned earlier, we can call the test function as describe:
import describe from 'node:test'
describe('Meu teste aqui', (context) => {})Subtests#
Like the most famous test frameworks, Node’s test runner also has the ability to do subtests.
By default the test function will accept a second parameter, as you should have noticed in the previous examples, which is a function that takes two parameters: a context and an optional callback called done.
The context object is of type TextContext and will have the following properties:
context.diagnostic(message: string): You can use this function to write text output to the TAP protocol, which we’ll discuss later. Think of it as a debug output; instead of usingconsole.log, you can usediagnosticto receive information at the end of the test report.context.runOnly(shouldRunOnlyTests: boolean): A programmatic way to run the test runner with the--test-onlyflag; if the function parameter istrue, this context will only run tests that have theonlyoption set. If you run Node with--test-only, this function is not executed.context.skip([message: string])andcontext.todo([message: string]): The same as passing theskipandtodoparameters to the functioncontext.test([name][, options][, fn]): The same function recursively, so they can continue to be nested
To create a subtest, just call context.test inside a higher-level test:
test('top level', async (context) => { await context.test('subtest 1', (context) => { assert.strictEqual(1,1) })
await context.test('subtest 2', (context) => { assert.strictEqual(1,1) })})It’s important to note that subtests must be asynchronous, otherwise the functions won’t be executed.
Skip, only, and todo#
Tests can receive special flags as parameters; currently there are 3 available flags:
skip: the test will be skipped if theskipoption is truthy (a string or any value). If it’s a string, as mentioned before, the message will be shown in the test output at the end:
// Skip without messagetest('skip', { skip: true }, (t) => { // Nunca executado});
// Skip with messagetest('skip com mensagem', { skip: 'this is skipped' }, (t) => { // Nunca executado});
test('skip()', (t) => { // Tente sempre retornar a chamada da função return t.skip();});
test('skip() com mensagem', (t) => { // Tente sempre retornar a chamada de função return t.skip('this is skipped');});onlyis a flag used when the test runner is run with the--test-onlyflag from the command line. When this flag is passed, only tests with theonlyproperty set totruewill be executed. It’s a dynamic way to skip or run only specific tests.
// Vamos assumir que rodamos o comando node com a flag --test-onlytest('esse vai ser executado', { only: true }, async (t) => { // Todos os subtestes dentro desse teste vão rodar await t.test('vai ser executado');
// Podemos atualizar o contexto para parar de executar // No meio da função t.runOnly(true); await t.test('o subteste vai ser pulado'); await t.test('esse vai ser executado', { only: true });
// Voltando para o estado anterior // onde executamos todos os testes t.runOnly(false); await t.test('agora este também vai rodar');
// Explicitamente não executando nenhum destes testes await t.test('skipped 3', { only: false }); await t.test('skipped 4', { skip: true });});
// A opção `only` não é setada então o teste não vai ser executadotest('não executado', () => { // Nunca vai rodar throw new Error('fail');});todois a simple message that will mark the test as “to do” instead of executing or skipping the test. It works exactly like all other flags and can also be set in the options object.
Running from the command line#
To run it, we can simply use the node command followed by the --test flag. To run specific files, just pass them to the command as the last parameter:
$ node --test arquivo.js outro.cjs outro.mjs diretorio/If we don’t pass any parameters, the runner will follow these steps to determine which test files to execute:
- Without passing any path, the cwd (current working directory) is searched recursively in the current directory using the following criteria:
- The directory is not
node_modules(unless specified) - If a directory called
testis found, all files within this directory will be treated as test files - For all other directories, any file with the extension
.js,.cjsor.mjsis treated as a test if:- Named
testfollowing the regex^test$, liketest.js - Start with
test-following the regex^test-.+, liketest-exemplo.cjs - Have
.test,-testor_testat the end of their base names (without the extension), following the regex.+[\.\-\_]test$, such asexemplo.test.jsoroutro.test.mjs
- Named
- The directory is not
Each test is executed in its own child process using child_process. If the process exits with code 0 (no error), it’s considered correct, otherwise it’s a failure.
The most interesting thing is that any type of test that emits TAP output can be run by Node’s test runner, even if it doesn’t use
node:testinternally.
Using TAP for more readable output#
The test runner uses a fairly well-known protocol called TAP (Test Anything Protocol). It’s great, but the output is extremely hard to read when run from the command line. Plus, the default output lacks some analyses like code coverage.
For this, there are packages like node-tap that parse this protocol to display output in a much more user-friendly way. To use it, just install it locally or globally:
$ npm i [-g] tapTap accepts any input from stdin, so we just need to pipe to it when running tests with node --test | tap, and we get much cleaner output for both errors:
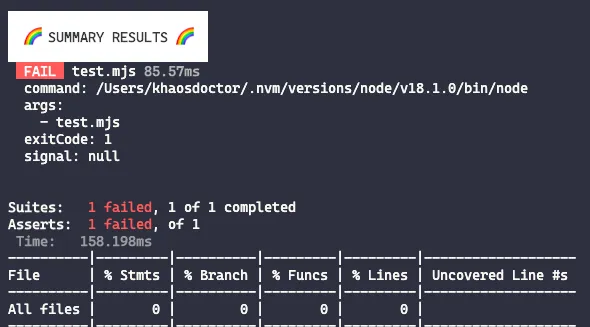
And for successful tests:
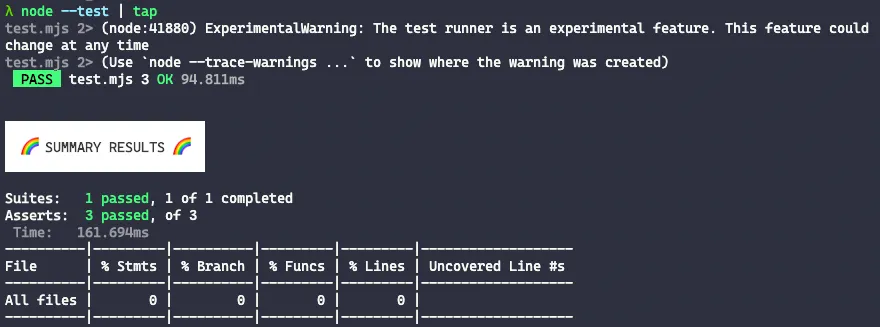
Conclusion#
Node’s test runner will be one of the tools that can most impact code workflows in practically all applications, and this means it’s possible that other packages and systems will begin to use these premises to set the testing standard in all JavaScript environments.
Remember that the package documentation is available on the Node website!