Creating bots for Telegram with GrammY
When we talk about modern applications, we inevitably end up with bots. Using bots to automate tasks or even facilitate communication with APIs is becoming increasingly common, and one of the platforms where bots are most common is Telegram.
Personally, I haven’t ventured much into the world of bots until recently, but on that journey I discovered an excellent tool to make it easier (and even revolutionize) the way you create bots for Telegram. That tool is GrammY.
In this article, we’ll create a bot that searches for repositories on GitHub and sends them to a chat inline. In other words, we’ll just type @bot and send the repository name so it searches the repository according to what was typed.
But first, let’s understand how the message flow works for a bot on Telegram.
How a Telegram bot works#
Telegram is known worldwide for being a simple and easy-to-use platform and also for being easy to extend. Through extensions, we have several types of bots we can create and use all the power of the platform, creating buttons, menus, and even complete websites that can be displayed back to users. In fact, much of Telegram itself runs on bots.
All interaction of your bot with Telegram happens based on a webhook, that is, each new event from a new message or any other activity that occurred directly with your bot or in any group that it’s a member of will be sent through a POST request to an address you define for the bot.
The address of your webhook is not set by default, but we’ll define it a bit later with a specific endpoint.
Each type of message update on Telegram creates an event. This event can be one of the types described here in the documentation. The response will always be a JSON with an update_id key and the next key will be the type of event that was sent. For example, if we’re receiving an update from a message submission, then we’re expecting an event of type message, so the payload we’ll receive will be the following:
{ "update_id": 821159882, "message": { "message_id": 1600269, "from": { "id": 172983467, "is_bot": false, "first_name": "Lucas", "last_name": "Santos", "username": "lhs_santoss", "language_code": "en" }, "chat": { "id": 172983467, "first_name": "Lucas", "last_name": "Santos", "username": "lhs_santoss", "type": "private" }, "date": 1664119114, "text": "Teste" }}Everything inside the message.from field is relative to the user who sent the update event, and everything inside the message.chat key is relative to the chat where the bot was activated.
To respond to a request, we can either respond to the update call itself with the result we want to be returned (it can be sending another message, a keyboard, an inline query, etc.), or by sending a response directly to Telegram’s bot API which is https://api.telegram.org/bot<token>/<method>, where the token is your bot’s token received from BotFather and the method is one of the methods described here in the documentation.
So I could send a message back to a user who sent me this message, in addition to responding to the original request, using the request https://api.telegram.org/bot123456:ABC-DEF1234ghIkl-zyx57W2v1u123ew11/sendMessage with the parameters described here.
Creating your first bot#
To start creating a bot on Telegram, you first need to talk to another bot called BotFather. Just click this link to talk to it directly.
Then just type /newbot and answer the questions as asked.
Remember that all Telegram bots need usernames ending in
bot, and it’s quite difficult to find a valid name that isn’t already in use.
Once you’re done, the bot will respond with an access token. Keep this token safe, because that’s how we’ll be able to control your bot.
Having done that, let’s expose a local port to the cloud so we can connect our bot and test our messages. We can do this with ngrok, just download and install the ngrok binary and run the command:
ngrok http <your-port>In my case, I’ll be using 8000, so we’ll type ngrok http 8000. The ngrok response will freeze your shell and give you a link something like https://<string>.<region>.ngrok.io, in my case it was https://fb83-80-216-0-139.eu.ngrok.io.
Using your preferred request tool (insomnia, postman) make a GET request to https://api.telegram.org/bot<token>/setwebhook?url=<urlfromngrok>, remembering that the URL needs to have the full protocol with it, so in my case it would be something like:
https://api.telegram.org/bot1234512345:ABCDEFABCDEFABCDEFABCDEFABCDEF-AbcdefAbcdef/setwebhook?url=https://fb83-80-216-0-139.eu.ngrok.ioYou should receive a response like:
{ "ok": true, "result": true, "description": "Webhook was set"}Now we can start coding our bot!
GrammY#
GrammY is a library made exclusively for creating bots for Telegram, abstracting much of the tedious work of having to manage all the context and conversation flow manually. Also, it supports plugins and can be extended with several cool functionalities that make creating a bot for Telegram even easier.
If you want to take a look at the traditional model of creating bots, see this point in the repository of the bot we’ll create:
GitHub - khaosdoctor/telegram-gh-bot at af0f3b1f71d7687eebc3537bf7e22cfb14d2a411First telegram bot without frameworks for study. Contribute to khaosdoctor/telegram-gh-bot development by creating an account on GitHub.khaosdoctorAnd compare it with the final version we’ll make in this article:
GitHub - khaosdoctor/telegram-gh-bot: First telegram bot without frameworks for studyFirst telegram bot without frameworks for study. Contribute to khaosdoctor/telegram-gh-bot development by creating an account on GitHub.khaosdoctorDeno#
GrammY is a framework aimed specifically at use with Deno. Personally, I think it’s amazing because it allows you to run TypeScript directly from the compiler, plus the dependency resolution within a Deno file, through modules being imported directly by URL, is much simpler and more straightforward.
So the first step is to install the deno runtime on your machine to have access to the deno command.
Initializing the project#
To create your environment using Deno, if you’re using VSCode, just install the official Deno extension and create a new folder, open that folder inside VSCode and, using CTRL/CMD + SHIFT + P, search for “Deno Initialize workspace configuration”.
This will create a new .vscode folder and a settings.json file inside it. We’ll leave it like this:
{ "deno.enable": true, "deno.unstable": true, "editor.codeActionsOnSave": { "source.fixAll": true, "source.organizeImports": true }, "editor.defaultFormatter": "denoland.vscode-deno"}Now let’s create the base files. This part depends on taste, but I like to create a src folder with all source files together and leave the configuration files at the root.
Let’s start by creating the import-map.json file, which will create a mapping of base website names and libraries to a simpler alias, let’s leave it like this:
{ "imports": { "x/": "https://deno.land/x/", "std/": "https://deno.land/std@0.156.0/" }}This is telling Deno that when we import something like x/name it will replace x/ with https://deno.land/x/ and the name of our package, just a convenience so we don’t have to write the full website every time.
Now we can tell deno where to find this file and also create the equivalent of our npm scripts in the deno.json file, which is the equivalent of package.json:
{ "importMap": "./import-map.json", "tasks": { "start": "denon run -A ./src/utils/pooling.ts", "setWebhook": "deno run -A ./src/utils/setWebhook.ts" }}Here I have two tasks, one of them is start which will initialize our bot and another is setWebhook which will create the webhook programmatically like we were doing before. We haven’t created either yet, but we’ll create them soon.
Notice that I’m using denon which is the equivalent of nodemon for Deno, to install this package just run deno install -qAf --unstable https://deno.land/x/denon/denon.ts
With the configuration done, let’s create an environment variables file called .env and put the following variables:
BOT_SECRET="Any string"BOT_TOKEN="Your bot token"GH_API_TOKEN="A github token"For BOT_SECRET, generate a sequence of 64 random characters, this will be a security key to guarantee that your bot is who it says it is.
For BOT_TOKEN, we’ll use the token that BotFather gave us, and finally we’ll go to GitHub to create a new token. It doesn’t need any permission since we’ll only use the API to search for repositories, this doesn’t require any special permission.
Creating the bot#
First, let’s create the src folder and inside it a file that will be our configuration file, from there we’ll pull all system variables at once. Let’s call this file config.ts:
import * as dotenv from 'std/dotenv/mod.ts'await dotenv.config({ export: true })
export const config = { bot: { token: Deno.env.get('BOT_TOKEN') ?? '', secret: Deno.env.get('BOT_SECRET') ?? '' }, gh: { token: Deno.env.get('GH_API_TOKEN') ?? '' }}export type AppConfig = typeof configWe’re importing dotenv, the module that loads environment variables directly from a .env file. Notice that we’re importing it with just std/dotenv instead of using the full original URL path.
Next, let’s create a file that will make our life easier when we need to create our webhook again if necessary. Let’s create a utils folder and inside it a file called setWebhook.ts.
In this file we’ll import the Bot object from GrammY, which represents the entire interface to the Telegram bot API, and our configuration file.
import { Bot } from 'x/grammy@v1.11.0/mod.ts'import { config } from '../config.ts'Now let’s initialize a new bot with our token by calling the init function:
import { Bot } from 'x/grammy@v1.11.0/mod.ts'import { config } from '../config.ts'
const bot = new Bot(config.bot.token)await bot.init()By default, GrammY has an API that overwrites all other Telegram APIs and creates an easy-to-use interface. However, if you need or want to call some method directly from the API, you can use the bot.api object which contains all methods with their parameters.
Remember when we called https://bot.telegram.org/bot<token>/setWebhook? So let’s use the bot.api.setWebhook function and pass the first parameter of our program to it, also sending our bot’s secret. The entire file looks like this:
import { Bot } from 'x/grammy@v1.11.0/mod.ts'import { config } from '../config.ts'
const bot = new Bot(config.bot.token)await bot.init()await bot.api.setWebhook(Deno.args[0], { secret_token: config.bot.secret }).then(console.log)Separating the search#
Since we’re going to make a bot to search GitHub, the idea is that we type @ourbot <repository name>, and then we can search by user or by repository name without problems, so let’s separate this functionality from the rest of the bot to keep everything organized.
Let’s create a folder called core and inside it a file called gh.ts. From here on we’ll use the fetch API to make calls directly to the GitHub API, but first let’s define our types.
A GitHub item has a response like this:
export interface GHSearchItem { id: number name: string full_name: string owner: { login: string id: number avatar_url: string url: string html_url: string } html_url: string description: string fork: boolean stargazers_count: number watchers_count: number language: string forks_count: number}While the complete result of the API response is as follows:
export interface GHSearchResult { total_count: number incomplete_results: boolean items: GHSearchItem[]}Now let’s create our search function. The idea is that we’ll receive the parameter we’re searching for, remove the URL if it exists, and from there make the call to our endpoint and limit the result to 3 items at a time.
Our final file looks something like this:
import { config } from '../config.ts'
export interface GHSearchResult { total_count: number incomplete_results: boolean items: GHSearchItem[]}
export interface GHSearchItem { id: number name: string full_name: string owner: { login: string id: number avatar_url: string url: string html_url: string } html_url: string description: string fork: boolean stargazers_count: number watchers_count: number language: string forks_count: number}
export const search = async (query: string) => { const sanitized = query.replace('https://github.com/', '') const result = await fetch(`https://api.github.com/search/repositories?q=${sanitized}&per_page=3`, { method: 'GET', headers: { Accept: 'application/vnd.github.v3+json', Authorization: `Bearer ${config.gh.token}` } }) return result.json() as Promise<GHSearchResult>}The Bot#
Now, let’s move to the main part, our bot. For this, we’ll create a new file inside src called bot.ts, where we’ll put all the logic surrounding our bot and everything we need for it to work and respond to messages, but we won’t listen to the server yet.
First let’s import the Bot class from GrammY, together with our configuration and the search interface we just made:
import { Bot } from 'x/grammy@v1.11.0/mod.ts'import type { AppConfig } from './config.ts'import { search } from './core/gh.ts'Then we’ll create a function called getBot, this function will bring our bot already configured. The first thing we need to do is tell the bot that we want to respond to a special type of message called inline_query, which is when the user is typing directly in the message box.
To do this, we’ll have to go back to our Telegram and talk to BotFather again, because by default, inline mode in the bot is disabled, so we need to send the /setInline command. With that, BotFather will ask which bot you want to change the settings for, just select one from the list.
After selecting, send in the next message what will be the placeholder text that will appear while the user is searching. In our case, it will be “Search GitHub Repos…”. And we’re done.
Now let’s go to our bot.ts file and create a listener for our message:
function getBot(config: AppConfig) { const bot = new Bot(config.bot.token)
bot.on('inline_query', async (ctx) => {Our context object ctx receives a series of properties from the Telegram request for us, such as the query the user made, what is the type, ID, and etc. And we’ll check if the query is filled in, that is, if the user has already written something in the query. If not, we’ll respond with an empty array of results:
function getBot(config: AppConfig) { const bot = new Bot(config.bot.token)
bot.on('inline_query', async (ctx) => { const { query } = ctx.inlineQuery if (!query) return ctx.answerInlineQuery([])Here we’ll use the ctx.answerInlineQuery command because we want the result to be answered in a list of results that appears at the top of the text box, not as a message. This method receives an array of results that follows a specific pattern that we’ll build when we have some result from GitHub.
If the user has already made a query, let’s pass that query to GitHub and check if we have any results. This is very simple because GitHub returns a total count of results in the response:
function getBot(config: AppConfig) { const bot = new Bot(config.bot.token)
bot.on('inline_query', async (ctx) => { const { query } = ctx.inlineQuery if (!query) return ctx.answerInlineQuery([])
const results = await search(query) if (results.total_count <= 0) return ctx.answerInlineQuery([])If we find something, we’ll respond using ctx.answerInlineQuery with the result of a map over the GitHub results array, building our message.
The inline query response object follows the following structure:
interface AnswerInlineQuery { type: 'article' // Fixed id: string // Unique ID of the response item title: string // Response title url: string // URL of the response item cache_time?: number // Time the response stays in cache on Telegram input_message_content: { // Content of the message sent when selecting the response message_text: string parse_mode: 'Markdown'|'HTML'|'MarkdownV2' } hide_url: boolean // Whether the URL should be hidden in the results list description: string // Description of the result thumb_url: string // Thumbnail of the result}We have all this information directly from the GitHub API, we just need to build our object as follows:
function getBot(config: AppConfig) { const bot = new Bot(config.bot.token)
bot.on('inline_query', async (ctx) => { const { query } = ctx.inlineQuery if (!query) return ctx.answerInlineQuery([])
const results = await search(query) if (results.total_count <= 0) return ctx.answerInlineQuery([])
return ctx.answerInlineQuery( results.items.map((item) => ({ type: 'article', id: item.id.toString(), title: item.full_name, url: item.html_url, cache_time: 300, input_message_content: { message_text: `[${item.full_name}](${item.html_url}) _${item.description || 'No Description'}_
*Stars:* ${item.stargazers_count} *Forks:* ${item.forks_count} *Language:* ${item.language}`, parse_mode: 'Markdown' }, hide_url: true, description: item.description || 'No description', thumb_url: item.owner.avatar_url })) )Notice that I’m sending text in Markdown in the body of the message. This text will be sent when the user selects that result. You can change this image to return whatever you think is coolest.
Finally, we return the bot and export our function. The entire file looks like this:
import { Bot } from 'x/grammy@v1.11.0/mod.ts'import type { AppConfig } from './config.ts'import { search } from './core/gh.ts'
function getBot(config: AppConfig) { const bot = new Bot(config.bot.token)
bot.on('inline_query', async (ctx) => { const { query } = ctx.inlineQuery if (!query) return ctx.answerInlineQuery([])
const results = await search(query) if (results.total_count <= 0) return ctx.answerInlineQuery([])
return ctx.answerInlineQuery( results.items.map((item) => ({ type: 'article', id: item.id.toString(), title: item.full_name, url: item.html_url, cache_time: 300, input_message_content: { message_text: `[${item.full_name}](${item.html_url}) _${item.description || 'No Description'}_
*Stars:* ${item.stargazers_count} *Forks:* ${item.forks_count} *Language:* ${item.language}`, parse_mode: 'Markdown' }, hide_url: true, description: item.description || 'No description', thumb_url: item.owner.avatar_url })) ) }) return bot}
export { getBot }Putting it all together#
To put all the parts together, we’ll create the src/mod.ts file which is the main entry file for Deno. In it we’ll initialize our bot using webhooks, for this we’ll have to import the webhookCallback function from GrammY which is precisely for setting the bot to listen to certain requests using a standard web server, in our case std/http.
First let’s import everything we need:
import { webhookCallback } from 'x/grammy@v1.11.0/mod.ts'import { serve } from 'x/sift@0.5.0/mod.ts'import { getBot } from './bot.ts'import { config } from './config.ts'const bot = getBot(config)Now let’s initialize our response handler for the server:
import { webhookCallback } from 'x/grammy@v1.11.0/mod.ts'import { serve } from 'x/sift@0.5.0/mod.ts'import { getBot } from './bot.ts'import { config } from './config.ts'const bot = getBot(config)
const handleUpdate = webhookCallback(bot, 'std/http', { secretToken: config.bot.secret})The handleUpdate function is the return from GrammY when we tell it to create a response object with bot using std/http as the server. However, we’re not using Deno’s native module to create a web server, but rather Sift, which is a web framework for creating servers without departing much from the pattern Deno already has.
The idea is that we have a serve function, just like we have in std/http, but we can pass a configuration object to that function, where each key is the route we’re listening to, and the value of the key is the response handler:
import { webhookCallback } from 'x/grammy@v1.11.0/mod.ts'import { serve } from 'x/sift@0.6.0/mod.ts'import { getBot } from './bot.ts'import { config } from './config.ts'const bot = getBot(config)
const handleUpdate = webhookCallback(bot, 'std/http', { secretToken: config.bot.secret })
serve({ '/': (req) => { return req.method === 'POST' ? handleUpdate(req) : new Response('Not found', { status: 404 }) }})Notice that we’re always listening to the / route, and when we detect that the route is not a POST, we’ll respond with a 404 status. Otherwise, we’ll pass our request to the bot.
Testing locally#
To test locally we can start our bot with denon run -A ./src/mod.ts and it should already be listening successfully on the port we set.
If you get an error when executing, try caching the dependencies locally with
deno cache --reload ./src/mod.tsorCMD + SHIFT + Pin VSCode and search for “Deno: Cache” and select “Deno: Cache Dependencies”
Now you just have to go to Telegram and make requests using your bot’s @:
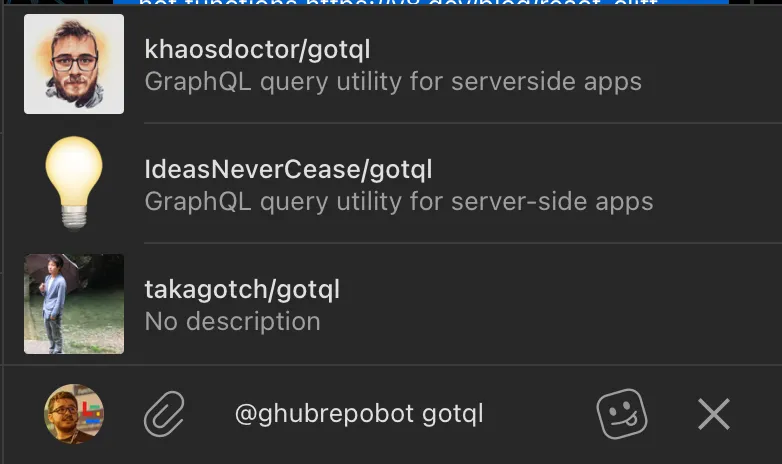
However, this method requires that we always have a URL to set our webhook, which can be a problem because that URL can change. With that in mind, to test locally, one of the best ways is to use a long pooling architecture, which will periodically check for new events on Telegram.
This is very simple, all we need to do is initialize our bot in another mode than the WebHooks mode. Let’s create a new file in utils/pooling.ts:
import { getBot } from '../bot.ts'import { config } from '../config.ts'
const bot = getBot(config)bot.start({ onStart: ({ username }) => console.log(`Bot started as @${username}`), drop_pending_updates: true})By default, GrammY’s bot.start will initialize the bot in long pooling mode, while you need to explicitly tell it to initialize in a Webhook model.
Then, we just execute our task in Deno with deno task start and we’ll have the same result.
Footnotes#
-
If you want to understand a bit more, the official documentation has a complete guide ↩