Applying Two Factor Authentication to SSH
We’re already very used to SSH for logging into virtual machines, like we did in our post where we created a VPN. But we know SSH accepts several levels of security when it comes to local access.
The first level of security, and the weakest, is an alphanumeric password. This is the weakest means because the communication between your computer and the server, even going over the SSH protocol, still transmits your password in plain text. A well targeted attack could capture your password and use it, if you’re not using any tunnel.
The second level of security, and also the one we use the most, is the RSA key pair. This kind of security makes it much easier for you to manage access, for example:
- We can allow several people to access the same machine without having a password passed around between them.
- We can revoke a single person’s credentials without having to change everyone else’s.
- Honestly, it’s much better not to have to remember a password than to have to remember one, right?
The big advantage of asymmetric keys is that you can prove you own a private key without actually having to show the key to anyone. In other words, you can give a public key to the server and, when you go to log in, the server will ask whether you have the private key that matches that public key. If you do, then you’re in.
Even so, many people still have a big problem because they need to manage these keys somewhere, and keeping your private key secret and safe is a very complicated task. So we can add a new layer of security to make an important server even more resilient. 2FA, or Two-Factor Authentication.
Two Factor Authentication#
TFA (or 2FA) is a security technique that requires you to use another device (usually a phone) to confirm a single use code, called an OTP, the One-Time Password.
This code is generated following some mathematical implementations we’re not going to discuss here, but it’s based on time. In other words, as long as your clock and the server’s clock are in sync, you will both generate the same code, which will be valid for a certain amount of time. If you type the same code the server generates, then you own the OTP.
Why use TFA?#
Passwords became something common and the main form of authentication. Using something only you know so that only you have access to a certain kind of data is a very simple concept and everyone can understand it. But over time, password use became very common with the Internet, everything we have asks for an account with a password or some kind of authentication.
Ideally you’d generate different passwords for different services, but it’s impossible to remember all those passwords, which is why we have services like 1Password, Dashlane or LastPass, so we can generate random passwords we don’t need to remember, since they’ll take care of logging in for us at the right moment and also of keeping the data safe.
What happens is that many people don’t know about or can’t use these services for all sorts of reasons and end up using the same password for several services. That way, if you use your password on a service with good security, say Azure, but also use the same password for services of dubious quality, when the weakest link breaks, the hackers will only need one password to access all of your accounts.
And that’s why TFA is so important. In general, TFA tries to improve security by adding an extra layer of authentication, which can be one of three factors:
- Something you know
- Something you have
- Something you are
Something you know would be your password, which isn’t interesting. Something you have would be a phone or another device, so using the combination “Something I know + Something I have” became very popular. Lately we’ve also been seeing the combination “Something I know + Something I am” with biometric or face recognition authentication.
Why use TFA on a server#
For the same reason you use TFA to protect your email accounts: to increase security.
Imagine you have a company and this company has technology worth millions, or stores very sensitive data on a server. That automatically makes it a very desirable target for hackers, so it’s important to add extra layers of protection.
Applying TFA on a server#
Enough concepts, let’s get our hands dirty! To start, I’m going to assume you already have a server running. It can be an Azure VM, a local VM, a Raspberry Pi, your call.
It’s also important that this server is already configured to use SSH keys as the way in. That way we can’t log in through a password. Most cloud providers today let you put your public key in as the authentication method on the VM.
Configuring SSH#
Before we start, I need to say that we cannot run the commands as sudo su , always use sudo when necessary inside the user you’re going to log in with.
First, let’s open the /etc/ssh/sshd_config file with our favorite text editor. You’ll see a file with several settings. The first of them is the port setting, which should read #Port 22. You can change the setting to increase security even further, since the default SSH port is well known, just remove the #. This port can be any one you choose, you only need to remember to open it at your provider and in your firewall.
Look for the PermitRootLogin line, it should have the default value #PermitRootLogin prohibit-password. Change this line to PermitRootLogin no.
Now let’s change the #PubkeyAuthentication yes line, removing the # to enable the setting.
We’re not going to restart the server yet, first let’s make sure we can install our TFA system correctly.
Installing TFA#
If you’re using any kind of Debian based system, in my case I’m using Ubuntu Server 18.4, just install the libpam-google-authenticator package with the command:
sudo apt install -y libpam-google-authenticatorIf you’re not on a Debian based distro, or you can’t install the library, search for “libpam-google-authenticator <yourdistro>” to get the correct installation instructions.
Run the script by typing google-authenticator on the command line. It’s going to ask you several questions, which you can answer yes to all of them, with two exceptions.
For the question:
Do you want to disallow multiple uses of the same authentication
token? This restricts you to one login about every 30s, but it increases
your chances to notice or even prevent man-in-the-middle attacks (y/n)
Answer n. This question is asking whether we want to disable logging in with the same token at the same time. If yes, you’ll only be able to log in once a new token is generated every 30s, if no, you’ll be able to log in at any moment. If this is a very important server, I recommend you type y, in our case we’re ignoring this option.
For the question:
By default, a new token is generated every 30 seconds by the mobile app.
In order to compensate for possible time-skew between the client and the server,
we allow an extra token before and after the current time. This allows for a
time skew of up to 30 seconds between authentication server and client. If you
experience problems with poor time synchronization, you can increase the window
from its default size of 3 permitted codes (one previous code, the current
code, the next code) to 17 permitted codes (the 8 previous codes, the current
code, and the 8 next codes). This will permit for a time skew of up to 4 minutes
between client and server.
Do you want to do so? (y/n)
Let’s type n. It lets us use the same previous token until a few seconds after it expired to compensate for the time difference between the server and the client. While that helps keep things simple, it also reduces security.
At the end, you’ll have an image similar to this one:
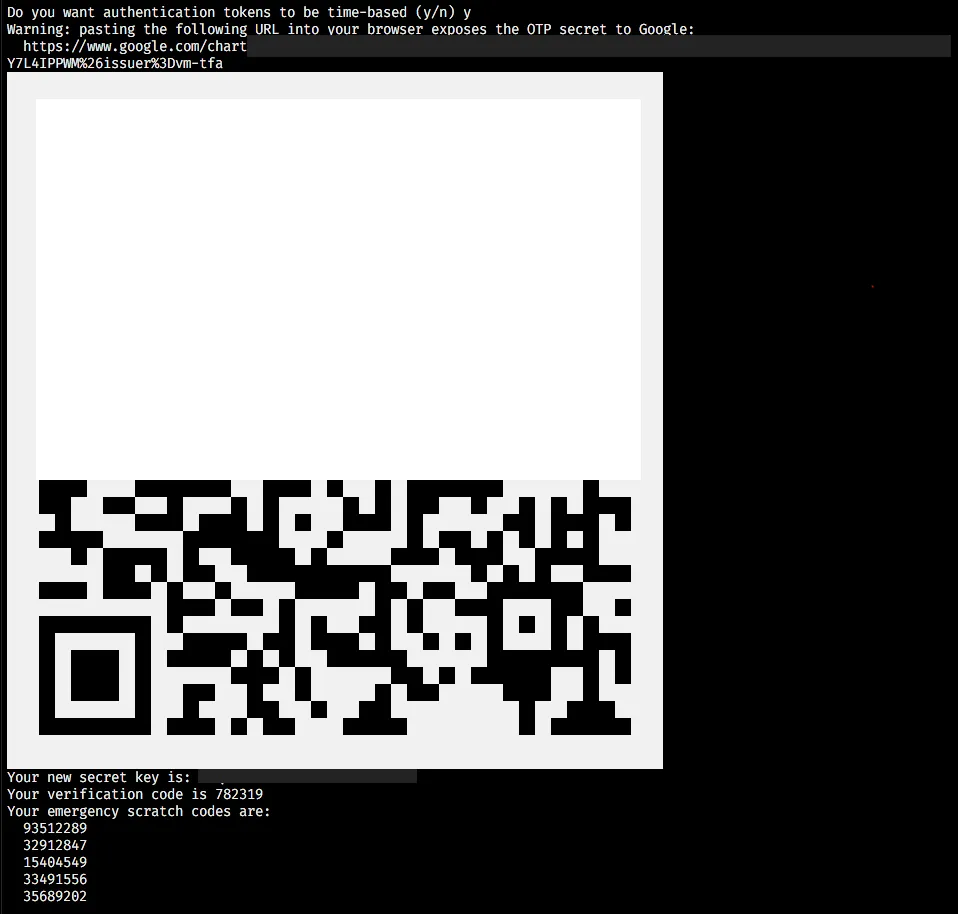
Just point a TFA app like Authy, 1Password or even Google Authenticator at the QR Code to register the new password, or use the Secret Key to generate it in apps that can’t read QR Codes.
Remember to write down the emergency codes and the verification code and keep them somewhere safe!
Now let’s edit the package’s configuration file so we can enable TFA use at login, let’s open the /etc/pam.d/sshd file. This file will already have some code in it, let’s make the following changes:
- Comment out the line that says
@include common-auth, this means TFA won’t ask for a password besides the OTP. - At the end of the file, add the following line:
auth required pam_google_authenticator.so - Save and close the file
Now go back to the SSH configuration file at /etc/ssh/sshd_config, let’s make SSH aware of the new authentication method.
Look for the ChallengeResponseAuthentication no line and change it to ChallengeResponseAuthentication yes. Then look for the UsePAM no line and change it to UsePAM yes.
Now let’s set the entry methods for SSH. For that, look for the AuthenticationMethods line, and if it doesn’t exist, add it right after the UsePAM line. On this line write:
AuthenticationMethods publickey,keyboard-interactiveLet’s restart the SSH service to enable the changes with the following command:
sudo systemctl restart sshdNow, in another terminal, try logging into your server, you should see something like this:
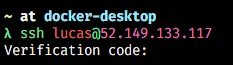
Now just type your authentication code and you’ll be logged in!
Conclusion#
Applying TFA to your servers may look like a drastic measure, but it helps keep your whole infrastructure safer, so you can be sure your data will be safer than with only a simple authentication using keys or passwords!