Have total privacy with your own VPN hosted in the cloud
Update - 2022!#
Hey folks! Because of the huge demand for this article, I ended up making a video on my YouTube channel! It makes it much easier to explain the concepts.
But still, this article goes much deeper overall! So I recommend watching both to get more details!
Don’t forget to subscribe to the channel and give it a like to help this knowledge reach more people!
Whether we’re working or simply browsing the Internet, one of the main questions we have is whether our network traffic is really safe or if we’re being spied on by our own Internet providers.
Based on that, I decided to use a paid VPN years ago, PIA VPN, but I ended up canceling it for two simple reasons:
- After some time they stopped having Brazilian servers because of the country’s internal policies regarding log retention, so the closest server was in the USA, which added a 120ms ping for each request
- PIA was recently acquired by an Israeli company that has a history that is, let’s say… a bit questionable when it comes to spying
Obviously, these reasons were purely personal, PIA is a great VPN but for me it wasn’t working anymore. So for a while I had no VPN until I came up with the idea of trying to build my own, since there were no other servers that didn’t keep logs here in Brazil.
Starting the process#
To start the process, I began researching various tutorials and ideas on how to create my own VPN, and by combining some of them I came up with a fairly quick and concise process to create my own VPN and be completely sure that no one is spying on the logs behind the scenes.
Here are some of the articles I used to create the VPN, some of them explain the reasons behind everything very well, others are simply step-by-step tutorials:
- How to set up your own VPN server
- Should you set up your own VPN?
- How to Make Your Own VPN
- Setup a personal OpenVPN server
Why should I build my own VPN#
As we already discussed in the previous paragraph, the main reason you’d want to set up your own VPN is precisely because you’re in control of all the logs and all actions within the server. So there’s no way for someone to spy on your actions in the process.
Furthermore, having your own VPN, especially for Brazilians, means that if you’re using a VPN purely for security, you’ll get access to public networks and even passwordless ones without worrying about security in general, because you’ll have a local server that adds very little latency to your connection. In other words, essentially, the encrypted tunnel you’ll create between your computer and your VPN will act only as an extra layer of encryption.
Less important than that is the ability you’ll have to allow other people to access your network through the same tunnel, so you’ll be able to share local files or even play LAN games over the Internet.
Problems with creating your own VPN#
The biggest use of VPNs nowadays is unfortunately not to protect yourself from prying eyes, but to change your geographic location so you appear to be in other countries, breaking some of the Geo-IP locks that some sites have, which prevent you from consuming content intended for a specific country, for example.
While it’s possible to create a server using cloud providers like Azure, which provide several virtual machines in various locations around the world, the cost you’ll have to create a VPN server in each region is still extremely high compared to the cost of hiring a ready-made VPN service, like NordVPN or TunnelBear. Although it’s completely possible if you’re willing to spend a few hundred reais per month.
Creating your own VPN#
With all that said, let’s move on to creating our own VPN. The first step is to create a server where we can access the VPN from the Internet. There are several ways to do this, one of them (which I’ll post here as soon as I finish) is to use a Raspberry Pi as a server and the No-IP service to expose it to the Internet.
Since we’re going to create our own server and we’re not going to store logs, there’s no problem creating it on cloud services like Azure, so let’s start by creating a server there.
Creating the server#
To create our server, you first need to have an account on Azure. If it’s your first time, you’ll get some credits that will help you avoid paying for the server, at least in the first few months.
When you enter the Azure portal, search at the top for “Virtual Machines”, click on the icon and you should land on a list of virtual machines, which will probably be empty. Click the “Add” button just below the title:

Select “Virtual Machine”:

When you select this option, we’ll have a form to fill out. It’s important that you pay attention to what we’re going to put here. First, let’s get an idea of how this form is divided.
The first section is general project data:
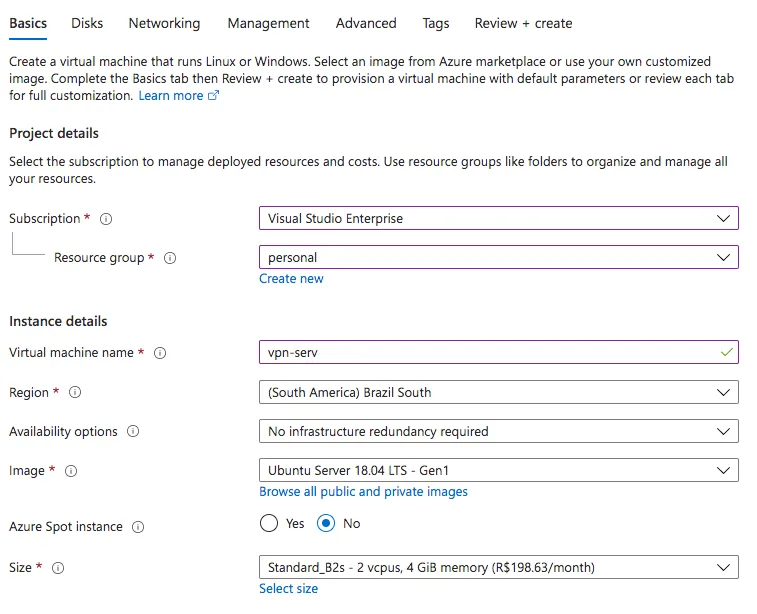
Now pay attention to what we’re going to put in each field:
- Subscription: This will be filled in automatically if you only have one Azure account. If not, it’s the account you want to be charged to.
- Resource Group: It’s good practice to create a new resource group to store the VPN data. You can click the “Create New” link below to create the new RG.
- Virtual Machine Name: This is the name of your machine. Here you can be creative and write whatever you find convenient. You just need to remember it later.
- Region: This is the most important part, where you’re going to create your server. Remember that you need to consider the local laws of each country. So if you want to access content available in the USA, create a server in the USA. If you want to download a torrent, avoid countries on the 14 eyes list. Let’s go with Brazil.
- Availability Options: In this field we define network redundancy. We won’t need that, so let’s keep it as is.
- Image: We’ll use Ubuntu for convenience in installing the scripts and the VPN, but if you’re skilled with Linux, you can use any distro you want.
- Azure Spot Instance: There’s a category of VMs in Azure that use unused cloud capacity at a much lower price, called Spot Instances. But the problem is that they don’t have availability guarantees, and your server can be deallocated if capacity is needed. We want the server to be as available as possible, right? So let’s leave this here as “No”.
- Size: This is the part where we have to decide the size of our machine. Azure gives you several different types and sizes of machines. The most common is the DS2_V3, but it’s overkill for what we want to do. So let’s select the B1s machine which has only 1 core and 1 GB of RAM.

In the next section, we’ll have authentication settings.
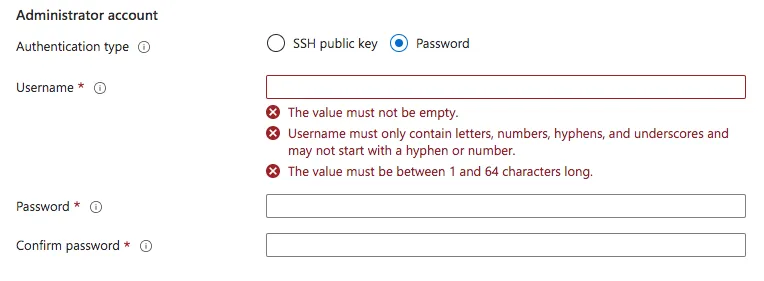
Here we have an important disclaimer. I’ll use “password” so everyone knows what to do when switching to SSH key access. Since the password is transmitted in plain text, it can be a means of attack for hackers.
What we’re going to do is set an initial password to log in. But the first change on the server will be to change SSH so we can access it on different ports and also through an SSH key instead of a password.
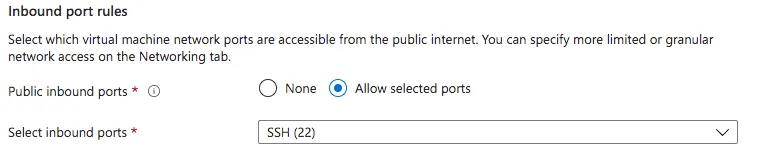
Finally, we have the port settings. We’ll leave only one port enabled, port 22 which is the standard SSH port:
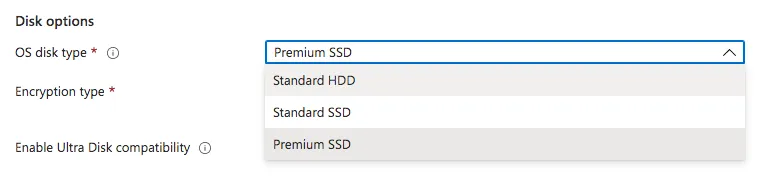
When you click “Next” we go to the disks section. We won’t add any new disk. We’ll just switch the default disk from “Premium SSD” to “Standard HDD”, since we don’t need speed and the HDD is much cheaper:
We’ll click “Next” and skip through the network section since we won’t change anything. In the “Management” section, we’ll disable all options:
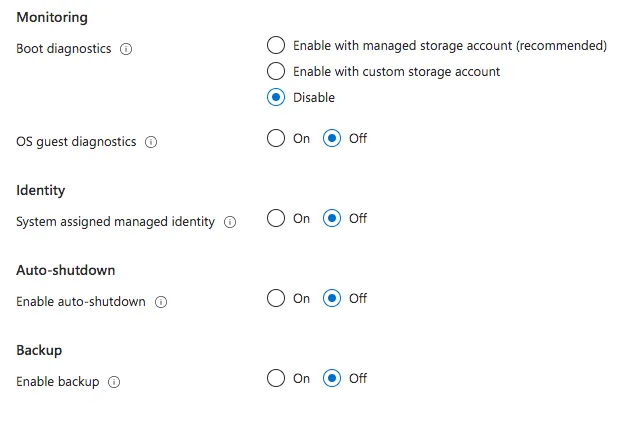
Then we click the blue button on the lower left “Review + Create”. After a quick review of settings, your server will be created. The process itself takes a few minutes, but as soon as it’s finished you’ll be able to navigate to the resource screen, and you’ll see something like this:

Securing the server#
As we mentioned earlier, accessing a security server using a password is hypocrisy, so let’s generate our SSH keys so we can access the server securely.
If you’re using Windows, open PowerShell and install OpenSSH with the following command:
PS C:\> Add-WindowsCapability -Online -Name OpenSSH.Client*If you’re on Mac or Linux, just open the terminal and OpenSSH should be installed by default. If it’s not, search for how to install OpenSSH for your distro before continuing.
We’ll use the following command to generate a key:
ssh-keygen -t rsa -b 4096Press ENTER when asked where you want to save the key to save it in the default directory (which is usually ~/.ssh). Otherwise, select a location where you’ll have access to leave your keys. You may have problems in the future if you don’t put it in the default directory.
We’re going to log in to the server to make the changes. To do that, just use the command:
ssh usuario@ipOnce inside the server we’ll update the operating system and the entire system with the classics:
sudo apt-get update && sudo apt-get upgradeThen we’ll install a text editor so we can edit the files we’ll need. Here the choice is personal. I like to use Vim, but you can install whatever works best for you.
sudo apt-get install -y vimWe’ll create a new non-root user that we can use to log in:
sudo useradd -G sudo -m nomedousuario -s /bin/bashThen we’ll create a password for this user:
passwd nomedousuarioNow, don’t disconnect from SSH on your server and open a new local terminal. We’re going to transfer our public key into the server so it can log in.
For this, on Linux or Mac we’ll run the following command:
ssh-copy-id usuario@ipOn Windows you’ll need to use a different command:
type $env:USERPROFILE\.ssh\id_rsa.pub | ssh seuip "cat >> .ssh/authorized_keys"Keep both terminals open. We’re now going to restrict access to those using passwords, and we’re also going to update the SSH port so it’s not exposed on port 22, which is the default.
The first thing we’re going to do is open the /etc/ssh/sshd_config file inside the VPN server. We’ll then look for the Port 22 line and change it. I’m using port 78 here, but you can use any port you want that’s not being used by another service:
# Port 22Port 78In the Azure panel, we’re going to go into the network settings to open the new port. To do this, in the VM panel, go to the sidebar and click on “Networking”:

You’ll see a list of all open ports and all network rules for your IP ordered by priority. Click the blue “Add inbound port rule” button:
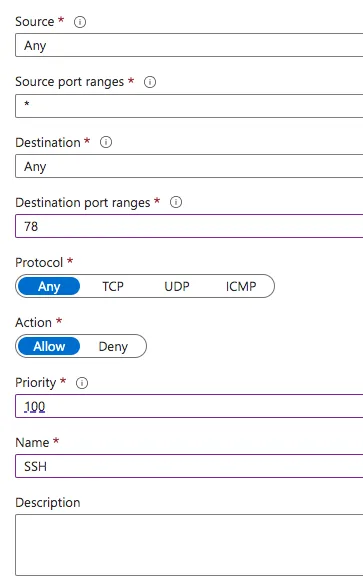
Fill in the information by changing the “Destination port ranges” to the number of the port you chose, set the “priority” to 100 and give an identifiable name for this network rule. Save.
Let’s also take the opportunity to open the next port we’re going to use, which will be port 443 UDP, which is used by OpenVPN to make the connection and handle data traffic. Click the button again to add another rule:
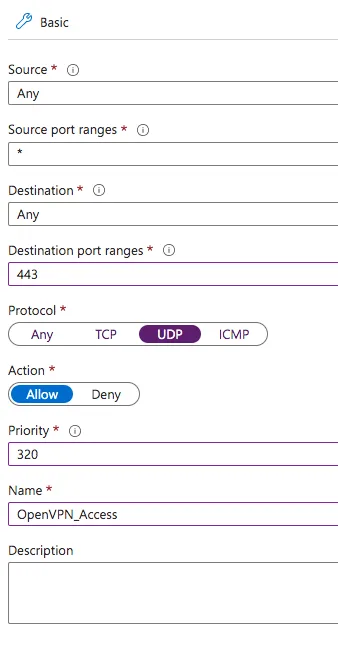
This time, we’ll set the “Destination port ranges” to 443 and select the “protocol” as UDP. We’ll leave the priority as is and give it an identifiable name. Now we have access open for the two main ports. Don’t close this tab yet, we’re going to have to come back here in a moment.
Going back to the server, we’ll continue modifying our configuration file. Now we’re going to look for PasswordAuthentication and disable password login:
PasswordAuthentication noWe’ll also disable root login:
PermitRootLogin noWe’ll save the file and restart the service using:
sudo systemctl restart sshdDon’t close the terminal that’s logged into the server yet, because if we have problems, we don’t want to be locked out, right? Open a new terminal and let’s try to log into the machine with the new user through the new port:
ssh -i ~/.ssh/id_rsa novousuario@ip -p portaIf you can log in without typing any password, or with a prompt to enter your key’s password, then everything is fine. You can try to test whether we can also log in without a key:
ssh novousuario@ip -p portaThis should give you a “Permission Denied”.
Now we can close the previous terminal that we had logged in as root. Let’s go back to the Azure portal and remove the default access rule for port 22 that was created. To do this, just click the three dots at the end of the corresponding line and select the “Delete” button.
(Optional) Creating an alias#
SSH allows you to create an alias to connect more easily to the server without having to type the IP, user, key and port every time. To do this, on your local machine, find the config file, which is in the .ssh folder in your $HOME directory (or ~/.ssh). Open it with your preferred editor and create a new entry:
Host minhavpn # can be any name User novousuario # login user Port porta # the port you chose IdentityFile ~/.ssh/id_rsa # If you saved the key in another location, put this location here HostName ip # IP address of the serverNow you can log into the server with the command ssh minhavpn.
This is completely optional. You don’t need to execute this step if you don’t want to.
Creating the VPN#
Creating the VPN is a fairly complex process, which requires you to install all OpenVPN packages, create IPTables, configure the firewall, create access keys and certificates that will be used to access the address and more.
The entire process is very complex and it’s easy to make a mistake and have to start all over. So, thanks to open-source, we have a user on GitHub called Nyr who created a script called OpenVPN Road Warrior Installation. This is what we’re going to use to install. It will ask you some simple questions and most of the time you’ll select the default answer.
Let’s install wget first on our server with:
sudo apt-get install -y wgetNow let’s download the script to our current path (which will probably be ~):
wget https://git.io/vpn -O openvpn-controller.shWe’ll give execute permission with chmod +x openvpn-controller.sh and then we’ll run the script with ./openvpn-controller.
Some important points during installation:
- Server port: The default OpenVPN port is 1194 UDP, but since it’s a standard port, we’ll choose another. In our case it’s 443 UDP that we opened in Azure.
- DNS server: The DNS server can be any one you prefer. I usually use
1.1.1.1or8.8.8.8. - Client name: This will be the name of the file you’ll generate with the configuration. I usually separate configurations by device, so if you’re going to use it on a Windows computer, it could be called
VPN_WIN.
At the end of the installation process, you’ll get a .ovpn configuration file. This file is the most important file of all because it has the access credentials so you can enter your VPN, as well as the client certificates and keys.
Removing Logs#
Finally, let’s do what most VPN services don’t do, which is disable logging.
For this we’ll access the OpenVPN configuration file with:
sudo vim /etc/openvpn/server/server.confChange the line that says verb 3 to verb 0. Save the file and restart the service with:
sudo systemctl restart openvpn-server@server.serviceNow we have no logs being kept by our VPN!
Downloading the credentials#
By default the script places the file in the root directory (because it needs to be run as administrator), so we’ll move the file to our directory and change the owner so we can modify it:
sudo mv /root/nomedoarquivo.ovpn ~sudo chown novousuario nomedoarquivo.ovpnNow let’s download the file. To do this, go to a local terminal and open an sftp connection to your VPN server with the command sftp minhavpn (or whatever name you put in your alias). Then run the following commands:
get nomedoarquivo.ovpn pasta/de/destinoexitNow your file is located on your local machine and the VPN is installed. It’s time to test!
Testing the VPN#
To test the VPN, if you’re on a Mac and want all your traffic to go through your VPN, which is what I do here, you’ll need free software called TunnelBlick.
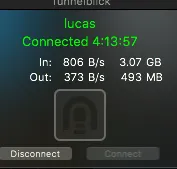
Just download the software and double-click on the .ovpn file you downloaded and it will be imported into the system. From there you can use the VPN like any other.
If you’re on Windows or any other device (even iOS, Android and the like) you’ll need OpenVPN Connect. From there the configuration is the same, just double-click the file to import it. If that doesn’t work, both programs have an import button.
Managing the VPN#
From the first installation you’ll already have the complete connection script. However, something I noticed is that using the same script for all your devices ends up being bad because the VPN doesn’t seem to handle traffic from the same client very well. So the solution is to create a new client for each device you use.
To do this you can access the VPN server again and run the same command you used to install the VPN. In other words, we use the same installation script because it’s smart enough to know when it’s already been installed and when you just want to manage.
Just the command sudo ./openvpn-controller.sh (or whatever name you gave the file) and it will show a list of possible commands:
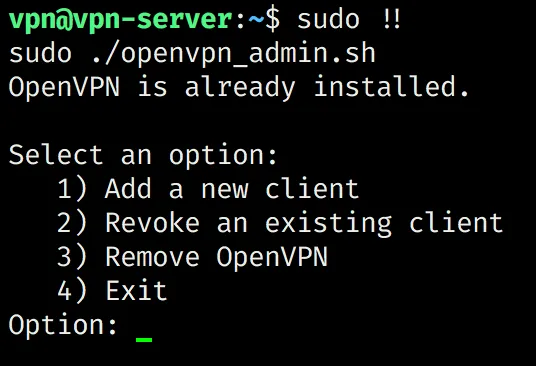
In it you can add new clients to give other people the ability to connect to your VPN or to add new devices to it. Just like you can also revoke an existing client and remove the VPN completely.
Conclusion#
The article got a bit long, but it contains everything you need to create your own VPN! In the next articles I’ll show you how you can further increase the security of your server with Two-Factor Authentication and also add automatic upgrades to keep the system always updated.
Stay tuned for the next chapters!
Footnotes#
-
You can also create multiple servers and leave them deallocated (stopped), which consumes much fewer resources and costs much less. Turn the server on only when you use it or schedule an automatic shutdown. ↩
-
You can also use other cloud services, like DigitalOcean, Linode, or any other you feel more comfortable using. ↩
-
If you’re already familiar with SSH login methods and know how to make the change, then you can select “SSH Public Key” to avoid rework. ↩
-
You’ll be asked for a password on your key. It’s completely optional, but adds an extra level of security. If you want to add it, feel free to. ↩
-
Remember that the user is the same user you entered when you created the server, and the IP is the public IP address that appears as a link in your VM panel in Azure. ↩
-
Remember that
vimcan be any editor. ↩ -
The service name may be slightly different depending on the machine you installed OpenVPN on and its version, so you may need to find the service name to restart it. ↩
-
Remember that you can also access it by other means. sftp is just one of them, but you can use
scpor even SFTP clients like FileZilla. ↩