Using JWT tokens securely
Web security is a concern that should be everyone’s priority, especially those working on software development projects. For developers, it’s far more worrying to build systems that don’t follow security rules, because any malicious action can escalate very quickly.
If you’ve read my content before, you know I’m a big fan of the RFC7519 standard, the famous JWT. In fact, quite a while ago I wrote an article about how it all works and explaining all the details of implementing that type of token.
The problem is that this implementation is inherently insecure, and I’ll tell you why.
GitHub - khaosdoctor/secure-jwt-tokens: Simple repository to show how to store JWT tokens in a secure waySimple repository to show how to store JWT tokens in a secure way - GitHub - khaosdoctor/secure-jwt-tokens: Simple repository to show how to store JWT tokens in a secure waykhaosdoctorThe problem#
Throughout the entire time JWT tokens have existed, they’ve been targets of various controversies, many of which say that tokens are subject to a specific type of attack called XSS Attack.
If you still don’t know what an XSS attack is, I’ll leave this video I made in partnership with Código Fonte TV
In most applications, when we receive a JWT token from the server, we typically think:
“Where am I going to store this token to avoid having to log the user in every time?” — Pretty much everyone
And, most of the time, LocalStorage is the chosen place. It’s an API that’s extremely simple to use, stores data between sessions and across tabs, so as long as the tab is on the same domain, the browser will store the token and allow it to be used. It’s one of the most efficient ways to do login.
The biggest problem is that it can be easily accessed via JS, so any site with an XSS vulnerability, that is, the ability to execute a malicious script on the domain, will make the token automatically insecure, because anyone can read that token using scripts.
The solutions#
There are a number of solutions to work around this problem. Let’s explore some of them.
Token in memory#
To work around this problem, we can use another technique. Instead of storing the token directly in LocalStorage, we can keep it only in memory, meaning we never store it anywhere. For example:
const _token = null
fetch('/login', { method: 'POST', headers: { 'Content-Type': 'application/json' }, body: JSON.stringify({ username: 'usuario', password: 'senha' })}).then(data => data.json()).then(token => { _token = token })Doing this makes the token virtually invisible to any script since it’s not in the same scope as another script and only lives in memory. Even though it’s still accessible with a memory dump, for that the attacker would need access to the victim’s computer.
However, we have a pretty strong downside. If the user refreshes the page or switches tabs, we won’t have the token saved in that new environment, so we’d need to ask the user to log in every moment, which isn’t excellent UX.
There’s a way to work around this obstacle by using long-duration tokens. We’ll talk about them later.
HttpOnly cookies#
To level up knowledge about cookies, a cookie is a piece of information up to 4kb that’s saved in the browser across tabs as long as they’re on the same domain. It’s another way to persist data even when the user’s session ends, because even if the user closes the browser, the cookies will still be there for future use.
Cookies are often used in those “Remember me” checkboxes during user logins.
The other option here would be to store the access token in a cookie with the httpOnly flag enabled. Cookies with this property are not accessible by JavaScript, only by the browser and requests.
const express = require('express');const app = express();
// middleware setup and so on...
app.post('/login', (req, res) => { // performs login... res.cookie('token', '12345', { maxAge: 5*60*1000, httpOnly: true, sameSite: 'strict' }); res.send('OK')})By the standard way browsers work, they send back to the server all cookies set by that same domain on every request. So in all subsequent calls to our backend, we would have a cookie with our user token there, and then we could validate through them instead of using an Authorization: Bearer header like it’s common.
The problem is that JWT tokens can store a lot of information and often these tokens exceed the 4kb limit, so it’s a bit risky to use these Cookies to store access tokens. Plus they’re saved on the user’s computer and, although they’re not targets of XSS, they could be victims of another type of attack called Cross Site Request Forgery or CSRF.
CSRF can be mitigated and prevented by using other anti-CSRF tokens, which is a topic for the next article.
A mix of ideas#
There are other possible solutions that I’ll talk about at the end of this article and also explore in more detail in future articles. But what if we used a mix of the two solutions I proposed before?
The idea is that we do user login, we store the access token directly in memory, no one will have access to it. But how do we deal with the question of maintaining logins?
Refresh Tokens#
One of the ways we have to deal with the case of volatile tokens like in-memory storage is the so called refresh tokens. The idea is that an access token is short-lived (at most 15 minutes) while a refresh token has a longer duration (a few hours or days).
A refresh token’s purpose is only to give you a new access token, so it has no internal information, and shouldn’t. That’s why it’s an extremely lightweight token that can be stored in a Cookie.
Basically, if we had a route like this, any valid refresh token could create a new access token:
router.post('/refresh', withRefreshAuth, (_, res) => { const accessToken = createAccessToken(user) const refreshToken = createRefreshToken(user)
setRefreshCookie(res, refreshToken) res.json({ accessToken })})Note that we’re also recreating the refresh token to avoid having another endpoint for it. So when we rotate one, we rotate both.
This solution still isn’t ideal because we still have a token that can produce other tokens. The biggest difference is that we can maintain greater control over the access tokens that were created and we can reduce the attack surface by having these tokens with a much shorter duration.
Fingerprinting#
One way we can keep refresh tokens safe is by using what we call fingerprints. They look a lot like CSRF tokens. The idea is to have a unique value that’s generated on the server side and stored as a secure Cookie.
Additionally, the fingerprint is included in the token, so that it can’t be altered without invalidating the token.
When the user makes a request to refresh, the fingerprint will go along with the refresh token. We can then decode the token and check if the fingerprint of the token is the same as the Cookie’s. If for some reason the Cookie’s fingerprint is different from the one in the token, we’ll have invalid access.
Additionally, we can create a hash of our refresh token and store that hash in a temporary database (like Redis) so we can invalidate sessions or compromised tokens as an additional protection measure.
To not make this article too long, I’ll write another one just about how the fingerprinting process was done.
Implementation#
To implement a solution like this, we’ll simulate an app that performs user searches. We’ll have some users in a local database and we’ll use two different tokens to be able to perform authentication. The code for this repository is on my GitHub:
GitHub - khaosdoctor/secure-jwt-tokens: Simple repository to show how to store JWT tokens in a secure waySimple repository to show how to store JWT tokens in a secure way - GitHub - khaosdoctor/secure-jwt-tokens: Simple repository to show how to store JWT tokens in a secure waykhaosdoctorBackend#
We’ll start with the backend. To simulate an application in the browser, I built a small app using only JavaScript and HTML so it’s much easier to see what happens under the hood.
Note: Remember that in this example, I’m intentionally leaving out some best practices for the sake of clarity.
Note 2: I won’t describe the basic files (package.json, tsconfig.json, etc.) You can go to the repository to copy them.
For this application we’ll use some libraries as direct dependencies, so run the install command:
npm i cookie-parser dotenv express jsonwebtokenI installed some development libraries, mainly for using TypeScript:
npm i -D @types/cookie-parser @types/node @types/express @types/jsonwebtoken copyfiles rimraf ts-node ts-node-dev typescriptIn my package.json I also created some scripts to facilitate development. The file looked like this:
{ "name": "jwt", "version": "0.0.1", "description": "", "main": "dist/backend.js", "scripts": { "dev": "tsnd src/index.ts", "build": "rimraf ./dist && tsc && copyfiles -u 1 \"./src/frontend/**/*.*\" ./dist", "start": "node dist/index.js" }, "keywords": [], "author": "Lucas Santos <hello@lsantos.dev> (https://lsantos.dev/)", "license": "MIT", "dependencies": { "cookie-parser": "^1.4.6", "dotenv": "^16.0.1", "express": "^4.18.1", "jsonwebtoken": "^8.5.1" }, "devDependencies": { "@types/cookie-parser": "^1.4.3", "@types/express": "^4.17.13", "@types/jsonwebtoken": "^8.5.8", "@types/node": "^18.7.3", "copyfiles": "^2.4.1", "rimraf": "^3.0.2", "ts-node": "^10.9.1", "ts-node-dev": "^2.0.0", "typescript": "^4.7.4" }}Skipping the basic app creation, we’ll create a src folder and inside it we’ll start creating our user database:
export type User = { username: string name: string age: number social: string password: string}
export const users: User[] = [ { name: 'Lucas Santos', age: 27, social: 'twitter.lsantos.dev', username: 'lsantosdev', password: '123456' }, { name: 'Rosa Barnett', age: 33, social: 'http://ko.st/wa', username: 'rosabarnett', password: '123456' }, { name: 'Russell Spencer', age: 66, social: 'http://egki.tp/ecbu', username: 'russellspencer', password: '123456' }]Now, we’ll create our entry point for our application, which will be the index.ts file. We’ll start by importing everything we need to use and defining global middlewares:
- We’ll use
cookie-parserto be able to parse theCookieheaders that the browser will send back to us, otherwise we won’t have thereq.cookieskey - To parse the request body (for the login route), I’m using
express.json()
import path from 'path'import dotenv from 'dotenv'import express from 'express'import cookieParser from 'cookie-parser'
dotenv.config()
const app = express()app.use(express.json())app.use(cookieParser())First we’ll load our variables from our .env file which should be at the root of our application and has the following content:
ACCESS_TOKEN_SECRET=secret_access_tokenREFRESH_TOKEN_SECRET=secret_refresh_tokenACCESS_TOKEN_DURATION_MINUTES=5REFRESH_TOKEN_DURATION_MINUTES=120This file is also in the repository, but remember that it’s not a best practice to send environment variables to a public repository. Additionally, the secrets for each token should be much more secure than the ones I put here.
To make it easier to understand, I’ll separate the handlers for each route into another file called handlers.ts, which we’ll create later, but we can already import it here too:
import path from 'path'import dotenv from 'dotenv'import express from 'express'import cookieParser from 'cookie-parser'
import { apiRoutes } from './handlers'
dotenv.config()
const app = express()app.use(express.json())app.use(cookieParser())Our frontend needs to be on the same domain as our application, so I’ll use express itself to serve the HTML files through express.static(). We’ll put the entire site behind a /site path to separate it from the API:
// Previous code
app.use('/site', express.static( path.resolve(__dirname, './frontend'), { cacheControl: false } ))Then we’ll use a Router to bring in our API routes:
app.use('/api', apiRoutes)And finally we’ll listen on port 3000:
app.listen(3000, () => console.log('JWT example listening on port 3000!'))Now we’ll create a new file called handlers.ts where we’ll create all our logic. First, we’ll import the functions we’re going to use:
import { createHmac } from 'crypto'import { NextFunction, Request, RequestHandler, Response, Router} from 'express'import jwt, { JwtPayload } from 'jsonwebtoken'import { User, users } from './users'Then, if you’re using TypeScript, we’ll extend two interfaces. The first one will be Express’s own Response so we can add typing to the res.locals object, which is an object where we can include any information to pass to the next middlewares.
In our case, we’ll have an object that will contain our user (which is already typed in our “database”) and the hash of our refresh token:
interface ExtendedResponse extends Response<any, { user: Partial<User>; refreshHash: string }> {}We’ll create another type that will be the payload of our token, which is the entire user object excluding the password and username (which is in the sub key):
interface AccessTokenPayload extends JwtPayload, Omit<User, 'username' | 'password'> {}Additionally, we’ll simulate a sessions database using a Map, where we’ll store our refresh tokens along with which user they belong to:
const refreshTokenDB = new Map<string, string>()Finally, we’ll create our router to start creating the routes:
const router = Router()Login#
Our API will have 3 routes. The first will be the login route, which will be completely open. The idea of this route is that we receive the user and password in the request body, check if the user exists in the database. If so, we’ll generate an access token and a refresh token for that user, set the necessary cookies, and return the access token directly in the response body so it can be saved by the front-end.
router.post('/login', (req, res: ExtendedResponse) => { const { username, password } = req.body const user = users.find((user) => user.username === username && user.password === password) if (!user) return res.status(401).send('Unauthorized')
const accessToken = createAccessToken(user) const refreshToken = createRefreshToken(user)
setRefreshCookie(res, refreshToken) res.json({ accessToken })})I’m using some helper functions to create the tokens. We’ll create them, starting with the token creation functions.
Creating the access token is quite simple. We just sign a new jwt with all the user’s data (except the password) and make it last only 5 minutes:
const createAccessToken = (user: User) => { return jwt.sign( { sub: user.username, name: user.name, age: user.age, social: user.social }, process.env.ACCESS_TOKEN_SECRET!, { audience: 'urn:jwt:type:access', issuer: 'urn:system:token-issuer:type:access', expiresIn: `${process.env.ACCESS_TOKEN_DURATION_MINUTES}m` } )}Notice that I’m using
audienceandissuerwith URNs. This is a best practice to identify who’s generating the token and who it’s destined for.
The refresh token is a bit more complicated because we have to add it to our database and create a timeout to expire this token. In databases like Redis, this type of function (called TTL) is already implemented by default.
First we’ll create a signed token. The token’s sub will be the user’s username. The token type is defined in the audience and it lasts 120 minutes:
const createRefreshToken = (user: User) => { const token = jwt.sign({ sub: user.username }, process.env.ACCESS_TOKEN_SECRET!, { audience: 'urn:jwt:type:refresh', issuer: 'urn:system:token-issuer:type:refresh', expiresIn: `${process.env.REFRESH_TOKEN_DURATION_MINUTES}m` })}Then we’ll create a hash of our token to save to the database, save the session and create the timeout. After that, we’ll return the token:
const createRefreshToken = (user: User) => { const token = jwt.sign({ sub: user.username }, process.env.ACCESS_TOKEN_SECRET!, { audience: 'urn:jwt:type:refresh', issuer: 'urn:system:token-issuer:type:refresh', expiresIn: `${process.env.REFRESH_TOKEN_DURATION_MINUTES}m` }) const tokenHash = createHmac('sha512', process.env.REFRESH_TOKEN_SECRET!).update(token).digest('hex')
refreshTokenDB.set(tokenHash, user.username) setTimeout(() => { refreshTokenDB.delete(tokenHash) console.log(`Refresh token ${tokenHash} expired`) console.table(refreshTokenDB.entries()) }, 5 * 60 * 1000)
console.table(refreshTokenDB.entries()) return token}Another function I’m using a lot is a utility just to avoid code repetition for creating cookies. It just creates the Cookie securely:
const setRefreshCookie = (res: ExtendedResponse, token: string) => { res.cookie('refresh-token', token, { httpOnly: true, secure: true, sameSite: 'strict', expires: new Date(Date.now() + Number(process.env.REFRESH_TOKEN_DURATION_MINUTES) * 60 * 1000) })}To make it easier, I’ll describe the objects we’re using to configure the cookies:
httpOnly: Prevents the token from being accessible by JSsecure: Prevents the use of the cookie outside HTTPS environmentssameSite: Cookies can only be used on the same domainexpires: Token expiration date
Refresh#
The next route we need to create is the refresh route, which will receive the cookie with the refresh token and perform the logic to create a new access token. But this route can only be accessible if the refresh token is present, so for that I’ll create an authentication middleware.
The idea of this middleware is that we first get the Cookie from inside the request and check if it exists. If not, we’ll return an error:
const withRefreshAuth = (req: Request, res: ExtendedResponse, next: NextFunction) => { const token = req.cookies['refresh-token'] if (!token) return res.status(401).send('Unauthorized')}After that, we’ll see if the token is valid. To do this, we’ll use the jwt.verify function which, at the same time, validates and decodes the token. If the process was successful, we should fall into our try. If not, we’ll return an invalid token error. Notice that I’m passing the audience to the verifier so it can also attest to the validity of this token:
const withRefreshAuth = (req: Request, res: ExtendedResponse, next: NextFunction) => { const token = req.cookies['refresh-token'] if (!token) return res.status(401).send('Unauthorized') try { jwt.verify(token, process.env.ACCESS_TOKEN_SECRET!, { audience: 'urn:jwt:type:refresh' }) } catch (error) { return res.status(401).send('Unauthorized') }}Inside our success block, we’ll then generate a hash of this token and include it inside res.locals:
const withRefreshAuth = (req: Request, res: ExtendedResponse, next: NextFunction) => { const token = req.cookies['refresh-token'] if (!token) return res.status(401).send('Unauthorized') try { jwt.verify(token, process.env.ACCESS_TOKEN_SECRET!, { audience: 'urn:jwt:type:refresh' }) const tokenHash = createHmac('sha512', process.env.REFRESH_TOKEN_SECRET!).update(token).digest('hex') res.locals.refreshHash = tokenHash next() } catch (error) { return res.status(401).send('Unauthorized') }}Now we can create our route with the authentication middleware:
router.post('/refresh', withRefreshAuth, (_, res) => {})The idea of the route is simple. We’ll do the following steps:
- We’ve already validated the token, so we need to check if it exists in our database
- If it does, we’ll find the user it’s related to
- We generate a new access token and a new refresh token
- We send the refresh token via cookie and return the access token
The final code looks like this:
router.post('/refresh', withRefreshAuth, (_, res) => { const username = refreshTokenDB.get(res.locals.refreshHash) const user = users.find((user) => user.username === username) if (!username || !user) return res.status(403).send('Could not find user for this refresh token')
const accessToken = createAccessToken(user) const refreshToken = createRefreshToken(user)
setRefreshCookie(res, refreshToken) res.json({ accessToken })})A protected route#
Now we’ll create our user route, the route that will be protected by our JWT token. It will return one of our users from the database, but it needs to be protected by the access token (not the refresh one). We’ll create another middleware for it.
The idea is even simpler. We just need to get the token from inside the Authorization header and, if it’s valid, we can decode it and create a user object inside res.locals:
const withAccessAuth = (req: Request, res: ExtendedResponse, next: NextFunction) => { const token = req.headers['authorization']?.split('Bearer ')[1] if (!token) return res.status(401).send('Unauthorized') try { const { sub, name, age, social } = jwt.verify(token, process.env.ACCESS_TOKEN_SECRET!, { audience: 'urn:jwt:type:access' }) as AccessTokenPayload
res.locals.user = { username: sub!, name, age, social } next() } catch (error) { return res.status(401).send('Unauthorized') }}Remember that for this type of protected route, it’s standard to send an
Authorization: Bearer <token>header. That’s why we’re splitting the string.
We can already create our protected route:
router.get('/users/:username', withAccessAuth, (req, res) => { const user = users.find((user) => user.username === req.params.username) if (!user) return res.status(404).send('User not found')
res.json(user)})The idea is simply to find a piece of data in the database and return that data, always validating if the passed token is valid.
With this, we finish creating our routes. We just need to export our router:
export const apiRoutes = routerFront end#
Now that we’ve finished the backend of our application, we’ll start working on the frontend. To make it easier, I didn’t use any framework, but created everything from scratch using only Bootstrap for CSS and a JS file where we’ll put our logic.
For the HTML file, it doesn’t make much sense to explain what’s happening in it, especially since it only has the page markup. So I’ll just leave the code that’s in the index.html file inside a src/frontend folder here so we can look at it:
<!DOCTYPE html><html lang="en"> <head> <meta charset="UTF-8" /> <meta http-equiv="X-UA-Compatible" content="IE=edge" /> <meta name="viewport" content="width=device-width, initial-scale=1.0" /> <!-- CSS only --> <link href="https://cdn.jsdelivr.net/npm/bootstrap@5.2.0/dist/css/bootstrap.min.css" rel="stylesheet" integrity="sha384-gH2yIJqKdNHPEq0n4Mqa/HGKIhSkIHeL5AyhkYV8i59U5AR6csBvApHHNl/vI1Bx" crossorigin="anonymous" /> <title>Safe JWT</title> </head> <body class="m-3"> <div class="container"> <div class="row align-items-center"> <div class="col text-center"> <form id="loginForm" class="input-group mb-3"> <input required type="text" name="username" class="form-control" autocomplete="username" placeholder="Username" value="lsantosdev" /> <input required type="password" class="form-control" autocomplete="current-password" name="password" placeholder="Password" value="123456" /> <input id="loginAction" class="btn btn-dark" type="submit" value="Login" /> </form> </div> <div class="col text-left"> <div class="alert alert-primary show fade" role="alert"> <strong>Message:</strong> <span class="login-result"></span> </div> </div> </div>
<div class="row mb-5 align-items-center"> <div class="col-6 text-center"><strong>Raw access token</strong></div> <div class="col-6 text-center"><code id="rawToken"></code></div> </div>
<div class="row align-items-center"> <div class="col-6 text-center"><strong>Decoded access token</strong></div> <div class="col-6 text-center"><pre id="decodedToken"></pre></div> </div>
<div class="row align-items-center mt-5 mb-5"> <div class="col-12 text-center"><button type="button" class="btn btn-primary" id="refreshAction" disabled>Force token Refresh</button></div> </div>
<div class="row align-items-center"> <div class="col-6 text-center"> <form id="userForm"> <input required type="text" name="username" autocomplete="username" placeholder="Search for username" /> <input id="userAction" type="submit" value="Search" /> </form> </div> <div class="col-6 text-left"> <div class="alert alert-info show fade" role="alert"> <strong>Results:</strong> <pre class="user-result"></pre> </div> </div> </div> </div>
<script src="index.js"></script> <script src="https://cdn.jsdelivr.net/npm/bootstrap@5.2.0/dist/js/bootstrap.bundle.min.js" integrity="sha384-A3rJD856KowSb7dwlZdYEkO39Gagi7vIsF0jrRAoQmDKKtQBHUuLZ9AsSv4jD4Xa" crossorigin="anonymous" ></script> </body></html>At the end, this HTML and CSS should give us a page like this (I’m not that good with design):
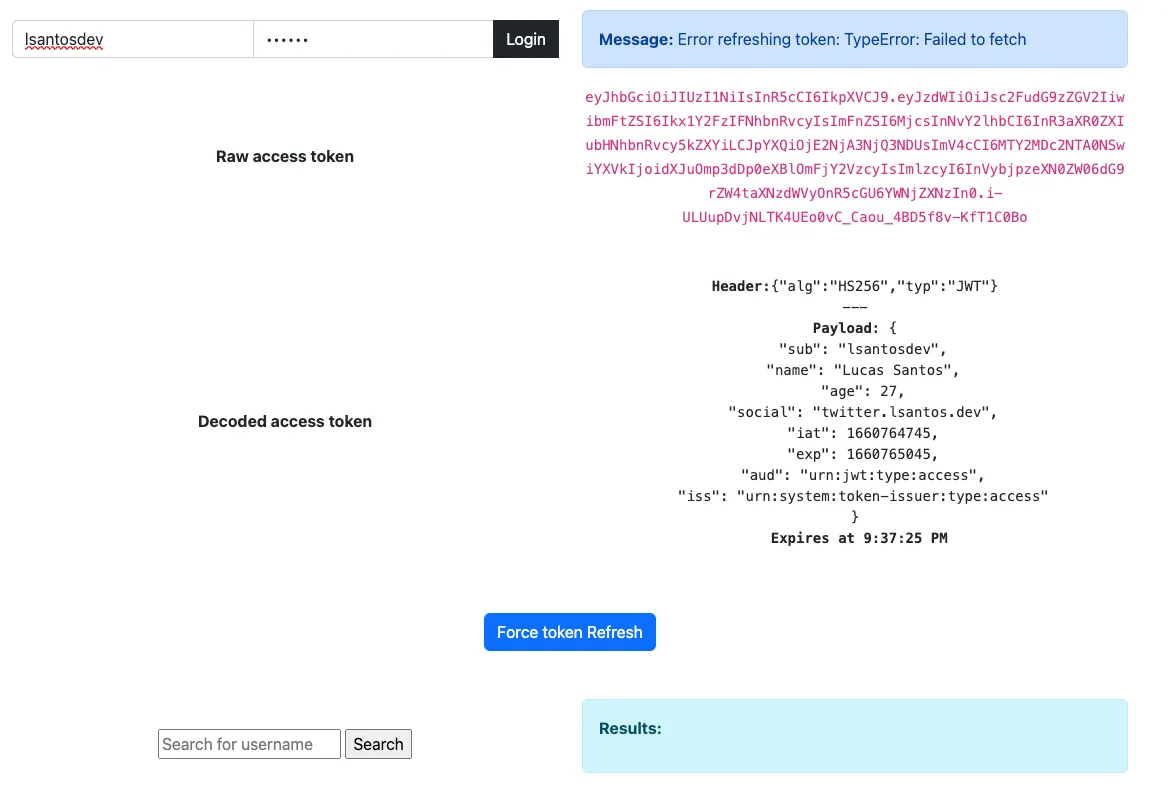
Inside the same frontend folder we’ll create an index.js file and do some setup.
First, to work more easily, I created a function to update error messages in the app:
function updateMessage(message, selector = '.login-result') { const infoBox = document.querySelector(selector) infoBox.innerHTML = message}Then, we’ll create a secure environment to store our access token. I know it’s tempting to put this information on the document object, but unfortunately that’s a global object that’s accessible by any script on the page. We’ll try to keep it more restricted.
Additionally, it would be a nice idea that when this token was updated, the screen was automatically updated too. That’s why we’ll use a Proxy along with a Symbol.
We’ll start by creating the Symbol:
const tokenSymbol = Symbol.for('accessToken')Now we’ll create a Proxy. The Proxy is an object that intercepts calls to other objects. Since it doesn’t work on primitives (like strings), we’ll create an object and use the Symbol as the key to access our access token:
const internalToken = new Proxy({ [tokenSymbol]: null }, {})The initial value will be null, and the second object will be our Proxy’s settings. The first one will be the getter setting, which is when someone tries to get the value of this object.
Since I’m working with the token object, I can’t return the proxy itself. So I’ll use the Reflection API to get the property that’s being called. If it’s a function, we’ll return it already with the correct this. If not, we’ll just return the value:
const internalToken = new Proxy({ [tokenSymbol]: null }, { get(target, prop) { const primitive = Reflect.get(target, tokenSymbol) const value = primitive[prop] return typeof value === 'function' ? value.bind(primitive) : value },})The next is the setter, which is where we’ll do the magic:
const internalToken = new Proxy( { [tokenSymbol]: null }, { get(target, prop) { const primitive = Reflect.get(target, tokenSymbol) const value = primitive[prop] return typeof value === 'function' ? value.bind(primitive) : value }, set(target, _, value) { document.querySelector('#rawToken').innerHTML = value
const header = atob(value.split('.')[0]) const payload = JSON.parse(atob(value.split('.')[1])) document.querySelector( '#decodedToken' ).innerHTML = `<strong>Header:</strong>${header}<br>---<br><strong>Payload</strong>: ${JSON.stringify( payload, null, 2 )}<br> <b>Expires at ${new Date(payload.exp * 1000).toLocaleTimeString()}</b>` document.querySelector('#refreshAction').disabled = false return Reflect.set(target, tokenSymbol, value) } })Basically, what we’re doing is updating our page with the information we receive and, in the end, we’re using the Reflection API again, this time to set the value of the Symbol with the new token.
Login#
We’ll do the login action when clicking the button. To do this, we’ll add an event listener that will convert our form data into FormData and then into JSON so we can use fetch to send it to our route:
document.querySelector('#loginForm').addEventListener('submit', async (e) => { e.preventDefault() updateMessage('Logging in...')
const form = new FormData(e.target) const data = Object.fromEntries(form.entries()) const result = await fetch('/api/login', { method: 'POST', headers: { 'Content-Type': 'application/json' }, body: JSON.stringify(data) })})After receiving the response, we’ll handle the result and update the token variable with our access token:
document.querySelector('#loginForm').addEventListener('submit', async (e) => { e.preventDefault() updateMessage('Logging in...')
const form = new FormData(e.target) const data = Object.fromEntries(form.entries()) const result = await fetch('/api/login', { method: 'POST', headers: { 'Content-Type': 'application/json' }, body: JSON.stringify(data) })
updateMessage(result.ok ? 'Login successful' : `Login failed with ${result.status}`) if (result.status === 200) { const response = await result.json() internalToken[tokenSymbol] = response.accessToken }})Silent Refresh#
Another technique that’s widely used with refresh tokens is silent refresh. It’s the act of refreshing the access token before it expires. So let’s say our access token lasts 5 minutes. Every 4.5 minutes we’ll silently make a request to the /refresh endpoint and it will give us a new access token as well as a new refresh token.
To do this it’s quite simple. We just use our login action to set an interval that will call a function that will refresh the tokens. Let’s change our login code to include two more lines:
document.querySelector('#loginForm').addEventListener('submit', async (e) => { e.preventDefault() updateMessage('Logging in...')
const form = new FormData(e.target) const data = Object.fromEntries(form.entries()) const result = await fetch('/api/login', { method: 'POST', headers: { 'Content-Type': 'application/json' }, body: JSON.stringify(data) })
updateMessage(result.ok ? 'Login successful' : `Login failed with ${result.status}`) if (result.status === 200) { const response = await result.json() internalToken[tokenSymbol] = response.accessToken setInterval(refreshToken, refreshIntervalMinutes) updateMessage('Next refresh at ' + new Date(Date.now() + refreshIntervalMinutes).toLocaleTimeString()) }})And let’s add a new variable at the top of the file to say when we want to do the refresh:
const refreshIntervalMinutes = 4.5 * 60 * 1000And we’ll take the opportunity to create the refresh function that will just make a fetch call:
function refreshToken() { updateMessage('Refreshing token...') fetch('/api/refresh', { method: 'POST' }) .then((res) => res.json()) .then(({ accessToken }) => { internalToken[tokenSymbol] = accessToken updateMessage('Next refresh at ' + new Date(Date.now() + refreshIntervalMinutes).toLocaleTimeString()) })}Searching for the user#
To make the user search call, we’ll use the same technique, sending the form data to our protected route with an Authorization header:
document.querySelector('#userForm').addEventListener('submit', async (e) => { e.preventDefault() if (!internalToken) return updateMessage('Login first', '.user-result') updateMessage('Searching user...', '.user-result')
const form = new FormData(e.target) const data = Object.fromEntries(form.entries()) const result = await fetch(`/api/users/${data.username}`, { headers: { Authorization: `Bearer ${internalToken}` } }) updateMessage(result.ok ? 'User found' : `Search failed with ${result.status}`, '.user-result') if (result.status === 200) { const response = await result.json() updateMessage(JSON.stringify(response, null, 2), '.user-result') }})Force refresh#
The last step is to bring the force refresh button to life, which is basically calling our refresh function that we created before:
document.querySelector('#refreshAction').addEventListener('click', refreshToken)Result#
The result can be seen when we click the login button:
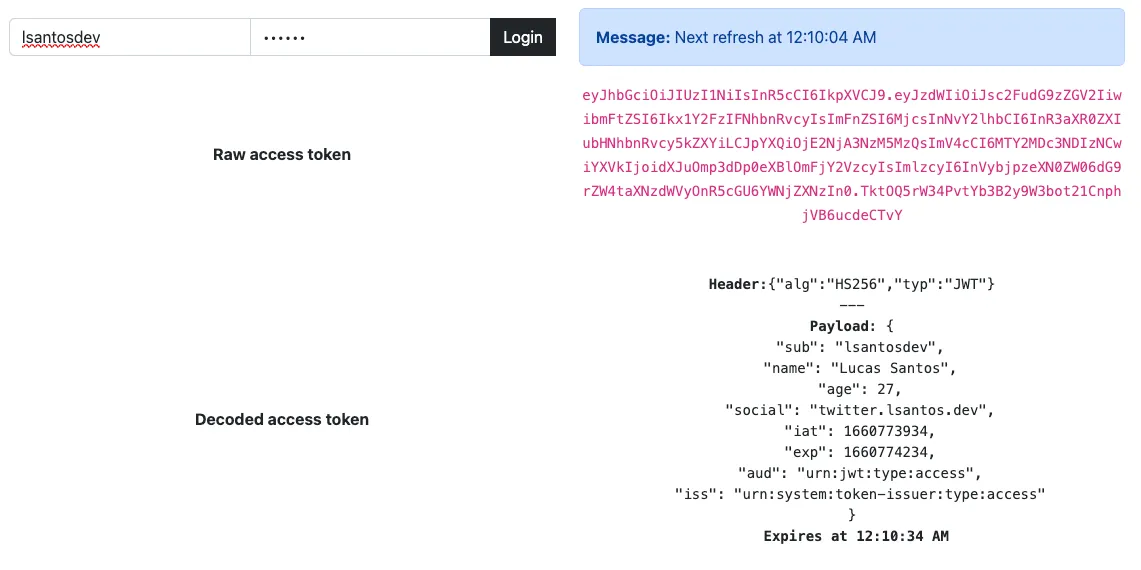
We’ll have the access token data available to JavaScript through memory, but we can’t get the refresh token unless we open DevTools on the application tab:
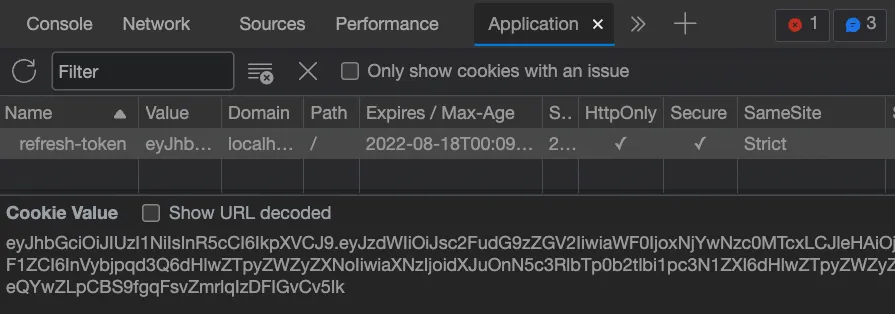
You can also see that we made the request that returned the cookie to us:
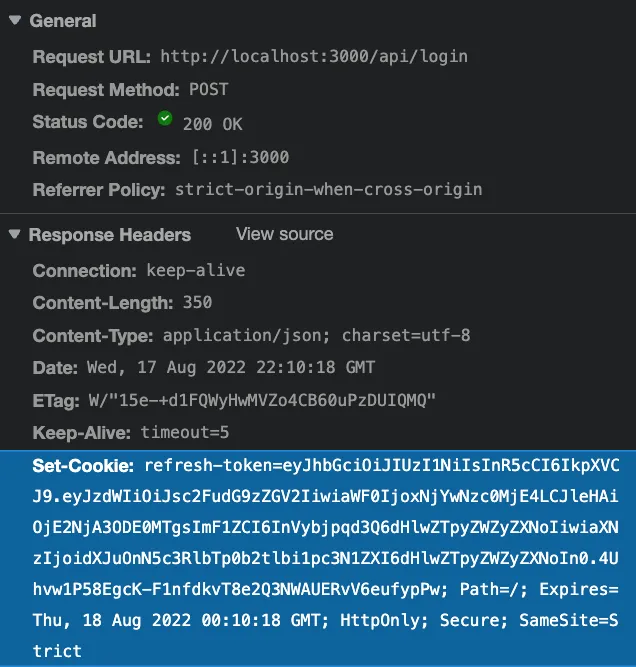
On the server side, we can see that the tokens are being set and expiring as time passes:
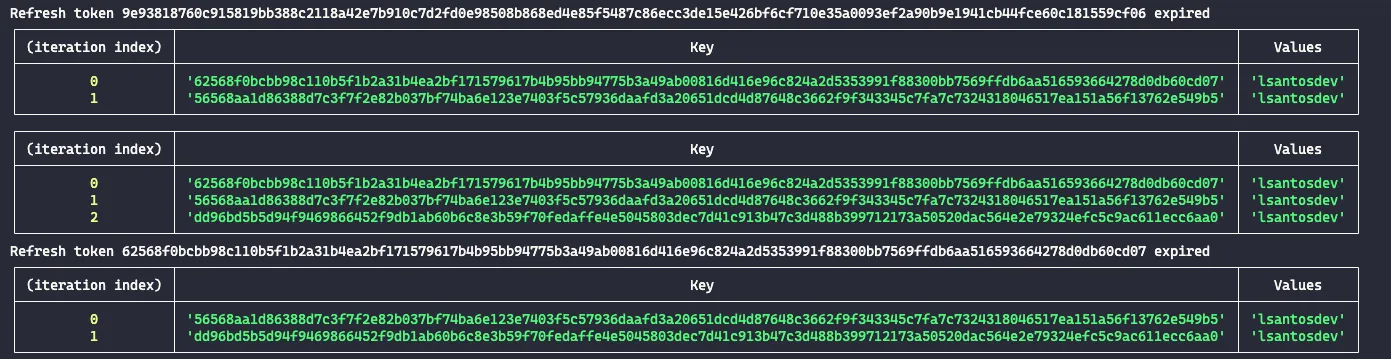
See how the final animated result turned out:
Conclusion#
This saga isn’t over yet! We’re going to explore much more about how we can store and use tokens securely in future articles! Two readings I highly recommend are the ones from the Hasura blog about tokens and this really cool article by Ryan Chenkie.
Don’t forget to come back to see and subscribe to the newsletter for new and exclusive content!
Footnotes#
-
The code used in this example can be found on my GitHub ↩
-
The code for this example is in the
fingerprintingbranch of the GitHub repository. Check thehandlers.tsandindex.jsfiles for the differences ↩