Cost Optimization with Kubernetes and AKS
Since the early days of distributed computing and the arrival of the cloud, everyone has had to deal with cost optimization in some way. Whether that optimization is in the form of reducing storage space or even reducing network traffic!
One of the most expensive tools when talking about distributed computing is Kubernetes. This is fairly obvious for two simple reasons:
- Kubernetes works with a cluster of machines
- Because it’s a cluster, we have more resources to manage
Unfortunately, this issue causes many great solutions to stop running in their ideal environment, which is a distributed and highly scalable environment, and instead run in smaller environments purely due to cost.
But it doesn’t have to be this way!
Billing Models#
To understand how we can optimize costs in a cloud architecture with distributed computing using Kubernetes, we first need to understand the billing models.
Each cloud provider has its own billing model. Here we will work only with AKS (Azure Kubernetes Service), which runs on Microsoft Azure.
If you use another cloud provider, check the provider’s website for pricing and billing options for each service offered. However, the optimization options I’ll show here work for all clouds, of course, with some changes in the command line.
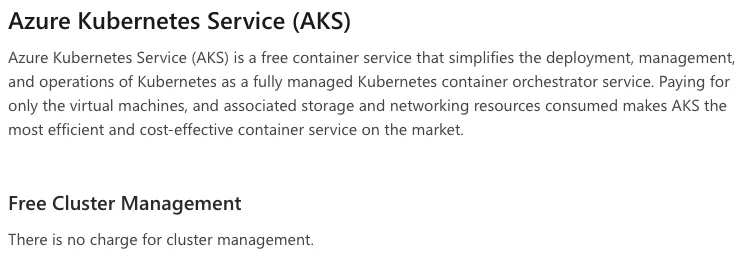
As we can see, in the case of AKS, billing is done only for the resources used, and cluster management as a whole does not have any extra charges. This means that, in a standard Kubernetes architecture, what we call the Control Plane, or the control plane where all system resources are created, is not charged. Instead, all other resources that Kubernetes uses to function are charged.
This is a common practice among several cloud providers. Some other providers also charge for control plane allocation, usually because they are not fully managed and allow people administering them to modify part of its content, meaning they offer greater customization capability.
And what resources would those be?
Billable Resources#
In general, creating a Kubernetes cluster requires a series of small resources ranging from virtual machines, which support the nodes, to network interfaces and traffic controllers. Depending on the type of features you’re choosing for your cluster, you may have DNS zones and other resources in that list.
In the case of AKS, when we create a cluster, we select what is called a Resource Group. In this resource group, Azure will create a control resource called Kubernetes Service, as we can see below:

However, where are all the billable resources I mentioned at the beginning of the paragraph? For this, because of internal management, Azure creates another resource group that starts with the name MC_<resource-group>-<cluster>_<region>. All the billable resources will be placed in it:
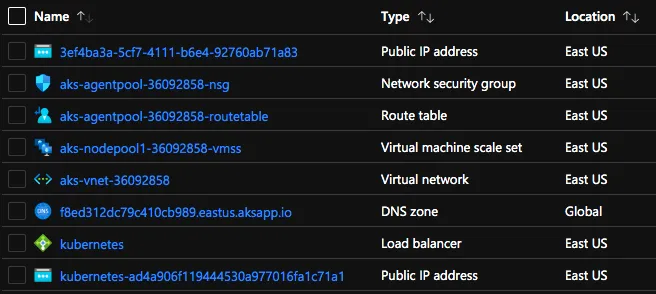
Notice we have eight different resources, but we can be charged for more than that because what is called Virtual Machine Scale Set is actually a list of VMs that can be scaled according to what we need.
Optimizing Costs with AKS#
To build this article, I’m using an excellent material available for free on Microsoft Learn. The course “Cost Optimization with AKS and Node Pools”.
In this article, we’ll go through the complete material, but I’ll give some examples outside the context and explain some things beyond what is being shown. However, it is strongly recommended that you complete the module, it is free and takes only a few minutes.
Setting Up the Environment#
To start, we’ll need three important items:
- You need to have Azure CLI installed on your machine
- You need to have Kubectl installed on your machine
- You need to have an Azure account
As a second option, if you already have an Azure account, you can go to Azure Cloud Shell and run all the commands there, because Cloud Shell already has both Azure CLI and Kubectl installed. If it’s your first time using Cloud Shell, then select Bash as your main shell.
Execute the following command to enable preview mode in your Azure CLI:
az extension add --name aks-previewThen execute the following command to register the permission features we’ll need:
az feature register --namespace "Microsoft.ContainerService" --name "spotpoolpreview"This command takes a few minutes to run. To check the progress, periodically run the command below:
az feature list -o table --query "[?contains(name,'Microsoft.ContainerService/spotpoolpreview')].{Name:name,State:properties.state}"While the result of this query is Registering, wait until it is Registered. Once registered, run the command to update the CLI:
az provider register --namespace Microsoft.ContainerServiceNode Pools#
Before we can proceed to create our cluster, we need to understand what are called Node Pools. They will be essential for us to save costs while using AKS.
Basically, a Node Pool describes a group of Kubernetes nodes that share common characteristics.
For example, we can have nodes that are specific VMs for Machine Learning, or those that have more memory. The purpose of Node Pools is precisely to allow people operating the cluster to have a choice to create their applications on the infrastructure that is most suitable for the type of work being performed.
In AKS, we have two types of Node Pools.
System Node Pools#
They are created automatically with the cluster and generally serve to store pods and deployments of the AKS and Kubernetes system. It’s not a good practice to run custom workloads using the same node pool. Every AKS cluster must contain at least one system Node Pool with at least one node.
User Node Pools#
As we can imagine, these are groups of nodes created by the user. In these pools we have some interesting configurations, as we can specify both Windows and Linux for the machines that are executed, and we can also allocate machines of different sizes and categories than those defined in AKS.
Execution Capacity#
Each node has a maximum pod execution capacity, meaning we can place a maximum number of pods within a VM before its resources are exhausted. For this reason, you can specify the number of nodes within a pool up to a limit of 100.
In user pools you can set the number of nodes to zero, while in system pools the minimum number is one.
Creating a Node Pool#
You can create a new pool in an existing cluster using Azure CLI with the following command:
az aks nodepool add \ -g <resource-group> \ --cluster-name <cluster-name> \ --name <pool-name> \ --node-count <number-of-nodes> \ --node-vm-size <VM-size-and-type>Scalability#
When a node reaches its maximum execution capacity, meaning when we’ve placed the maximum number of possible pods within that machine, we must increase, or scale, the number of nodes within the pool. This can be done manually through the following command:
az aks nodepool scale \ -g <resource-group> \ --cluster-name <cluster-name> \ --name <pool-name> \ --node-count <new-number-of-nodes>Scalability is one of the main reasons your cluster can become quite expensive. Mainly because the more machines, the more resources. And the more resources we use, the more we’ll have to pay. For this reason it’s highly recommended to use automatic ways to scale our pools, the primary one being Cluster Autoscaler.
Cluster Autoscaler#
Scalability should be automatic, as it’s much safer and also saves much more money because it will always increase the number of nodes when necessary and reduce the number of nodes when they no longer need to be used. You can activate the autoscaler in an existing cluster through the command:
az aks update \ -g <resource-group> \ -n <cluster-name> \ --enable-cluster-autoscaler \ --min-count <minimum-number-of-nodes> \ --max-count <maximum-number-of-nodes>Spot Instances with Node Pools#
One of the most efficient ways to save money while using AKS instances is through the use of multiple node pools with what are called Spot Instances.
Spot VMs#
Spot VMs are virtual machines that offer all the scalability features a normal VM would have, but still reduce costs through the use of spare computing capacity. This means that Spot VMs use computing power that is not currently being used by Azure, guaranteeing significant discounts on their prices.
However, this all comes with a price. Spot Instances, because they take advantage of unused computing power, can be shut down or interrupted at any time. This means that while using the VM, you’ll receive a notification 30 seconds before the machine is deallocated. After this time, the machine will enter a deallocation state and its computing will be stopped abruptly.
For this reason, Spot VMs are very good when we use applications that don’t maintain state and can be interrupted at any time, restarting their processes whenever necessary. Some use cases:
- Batch processing
- Stateless applications
- Development environments
- CI/CD pipelines
Combining Forces#
Using Spot VMs with node pools gives great power to save significant money when processing large-scale data. Mainly because, when we use Spot VMs with node pools, we have the ability to choose between two deallocation policies:
- Deallocate: When the policy is set to deallocation, the machine will be stopped and deallocated when the VM reaches a state where there is no more computing power. You can deploy it again when capacity becomes available, but remember that all CPU allocation and disk costs continue to be charged.
- Delete: In this case, the machine will be completely removed and you will not be charged for any more resources consumed.
Spot Node Pools#
Spot Node Pools allow you to set a maximum hourly value to pay. When the value is reached, the machine will be deallocated or removed according to the selected policy.
Although they guarantee a reduction in costs, Spot node pools are not recommended for any type of critical workload, as their availability is not guaranteed.
To create a spot node pool, we can use the following command:
az aks nodepool add \ -g <resource-group> \ --cluster-name <cluster-name> \ --name <pool-name> \ --enable-cluster-autoscaler \ --min-count <minimum-number-of-nodes> \ --max-count <maximum-number-of-nodes> \ --priority Spot \ --eviction-policy Delete \ --spot-max-price -1 \When we set the hourly price value to -1, the nodes will not be removed based on price and the new instances created will be based on the lower value between the current price of spot VMs or the default value of a node.
Creating Resources in the New Pool#
To create resources in our spot node pools, we need to understand the concept of Kubernetes Taints and Tolerations (we’ll have an article about this coming soon). And also the concept of Node Affinity.
In short, each node has a taint. These taints repel new pods from being created on these nodes unless these pods have a toleration for that specific taint. It’s a way to choose which VM your applications will be created on.
By default, all nodes created within a spot node pool will have a taint of type kubernetes.azure.com/scalesetpriority=spot:NoSchedule. This means that unless the pod has a toleration of the same type, no other pod can be scheduled on that node.
To create a pod, or any other workload, within a node that is present in a spot node pool, we need to define a new toleration in the pod’s declarative file, for example:
apiVersion: v1kind: Podmetadata: name: example-pod labels: env: examplespec: containers: - name: example image: node imagePullPolicy: IfNotPresent tolerations: - key: "kubernetes.azure.com/scalesetpriority" operator: Equal value: spot effect: NoScheduleNotice that we defined an operator so it equals the taint of the node in question, therefore new pods will be created on this node.
Conclusion#
Although it’s extensive work, the use of spot node pools can be a lifesaver in terms of resources when we’re working on cost optimization in AKS, but always remember that spot machines are not machines that guarantee high availability!
I strongly recommend reading the documentation about AKS cost optimization baseline, amazing documentation about how you can define policies and best practices for AKS clusters in production.
In this article we talked a lot about more advanced Kubernetes concepts, like taints and tolerations. I’m preparing an article just about these concepts and also about another really interesting tool from this container orchestrator, so don’t forget to subscribe to the newsletter to receive this content and also weekly news! Like and share your feedback in the comments!
See you soon