Creating test environments dynamically with GitHub Actions
How to optimize a test pipeline so teams don’t run into concurrency problems while testing their features and modules is a recurring subject in several topics I’ve covered both in the past and recently.
I’ve even given a few talks on the subject and I have an example repository using Azure DevOps as the CI tool. You can see the slides and the video below!
The question is: How can we make several development teams able to test their features in an environment completely separate from the others, simply and quickly?
The answer is, of course, containers. When we use Kubernetes with Helm together with a CI tool, we can do a lot of things dynamically. In this article, I’m going to update my previous talk and show the same application, but running on a GitHub Actions pipeline. To make the scenario more realistic, we’re going to use Azure with Azure Kubernetes Service pulling images from a private Azure Container Registry that’s already privately integrated with the cluster. All data will be stored in a Mongo-flavored CosmosDB.
Let’s go!
Before we start#
We’re going to have to create the environment before we start showing how the dynamic part can be done. Since that’s not the point of this post, I’ll leave only the command references for what we’re going to do here, but all the necessary documentation can be found directly in each service’s docs.
First you need an account on Azure. Once you have one, install the Azure CLI, we’re going to use the command line only.
The first command will be az login to log into your account and choose which subscription will be used to create the resources. As soon as the login is done, let’s start by creating the first resource, the resource group.
az group create -l eastus -n ship-manager-pipelineNow let’s create our ACR so we can store our images:
az acr create -n shipmanager --sku Basic -g ship-manager-pipelineWait until the CR is created and run the following command to enable login via username and password, that’s the only way we’ll be able to log in from our CI to build the images:
az acr update -n shipmanager --admin-enabled trueNow let’s move on to CosmosDB, with a single command we can create the whole structure:
az cosmosdb create --kind MongoDB -n ship-manager-db -g ship-manager-pipelineThis command takes a bit longer to run, so be patient. It’s important to say that, as great as it is, CosmosDB isn’t recommended for this specific case of creating databases when we have ephemeral environments like these, because it’s more complex to remove later on. But, to keep things simple, we’re going to use it and we’ll look at alternatives to this approach further ahead in the article.
Finally let’s create our AKS, which will tie all the parts together:
az aks create -n ship-manager -g ship-manager-pipeline \--enable-addons http_application_routing \--attach-acr shipmanager \--vm-size Standard_B2s \--generate-ssh-keys \--node-count 2This makes our AKS get created already hooked up with the ACR, so we don’t need to create a secret for each namespace with our Docker login file to pull the images, and we also don’t need to bind anything to a service account.
Get the AKS credentials with the following command:
az aks get-credentials -n ship-manager -g ship-manager-pipeline --adminRemember you need kubectl installed on your machine for this command to work. If you don’t have it, use az aks install-cli to install it.
Creating the chart#
The first step to creating the pipeline is knowing how it’s going to work. Initially we’re going to work with only two environments, the first will be the production environment and the second will be the test environment.
The production environment will be published whenever a push with a v* tag happens. The test environment will be published on a push to any branch other than master or main (depending on the case).
So you can follow along, I’ve put together this example repository that contains both the application code and the actions code itself.
If you want to follow along step by step, fork the repository, but don’t forget to remove the .github folder so the actions are removed.
Before creating the pipeline files, let’s create the Helm files, so we can create our chart! Create a folder called kubernetes at the root of the repository, then create a second folder called ship-manager.
Inside the ship-manager folder create two more folders: templates and charts. Now create two files at the same level as the templates folder, one of them will be called Chart.yaml and the other values.yaml.
Now, let’s go into the charts folder. In it, create a backend folder and, inside that one, add a Chart.yaml file followed by a templates folder.
The final structure should look like this:
kubernetes└── ship-manager ├── Chart.yaml ├── charts │ └── backend │ ├── Chart.yaml │ └── templates │ ├── templates └── values.yamlIn the Chart.yaml file in the ship-manager folder we’re going to write the following:
apiVersion: v2name: ship-managerdescription: Chart for the ship manager appversion: 0.1.0And the one in the backend folder will be this:
apiVersion: v2name: backenddescription: Chart for the backend part of the ship manager appversion: 0.1.0What we did was create Helm’s equivalent of a package.json, that is, the file that defines the package we’re going to install in our cluster.
Helm works based on a hierarchy. What we just created here is a dependency order, that is, we just said that the application’s frontend, which is in ship-manager, depends on a backend located in the charts folder. If we created another charts folder inside backend we’d be saying that the backend depends on it and so on. This way, when we run a single command, Helm already installs all the dependencies in order for us.
Let’s create our first template. Create a frontend.yaml file inside the templates folder located in the ship-manager folder. This template is what’s actually going to be created inside the cluster. In it we’ll have all the Kubernetes resources, starting with the Deployment:
apiVersion: apps/v1kind: Deploymentmetadata: name: ship-manager-frontendspec: replicas: 1 selector: matchLabels: app: ship-manager-frontend template: metadata: labels: app: ship-manager-frontend spec: containers: - image: {{ required "Registry is required" .Values.global.registryName }}/{{ required "Image name is required" .Values.frontend.imageName }}:{{ required "Image tag is required" .Values.global.imageTag }} name: ship-manager-frontend resources: requests: cpu: 100m memory: 128Mi limits: cpu: 250m memory: 256Mi ports: - containerPort: 8080 name: http volumeMounts: - name: config mountPath: /usr/src/app/dist/config.js subPath: config.js volumes: - name: config configMap: name: frontend-configNotice we’re using Helm placeholders to identify parts that can be changed, and that’s what makes everything possible. Creating environments and changing variables at CLI time and not after it’s been compiled means we can pass whatever values we want to those variables when creating the environment.
Then we have the other configurations:
apiVersion: v1kind: Servicemetadata: name: ship-manager-frontendspec: selector: app: ship-manager-frontend ports: - name: http port: 80 targetPort: 8080---apiVersion: networking.k8s.io/v1beta1kind: Ingressmetadata: name: ship-manager-frontend annotations: kubernetes.io/ingress.class: addon-http-application-routingspec: rules: - host: {{ default "ship-manager-frontend" .Values.frontend.ingress.hostname }}.{{ .Values.global.dnsZone }} http: paths: - path: / backend: serviceName: ship-manager-frontend servicePort: http---apiVersion: v1kind: ConfigMapmetadata: name: frontend-configdata: config.js: | const config = (() => { return { 'VUE_APP_BACKEND_BASE_URL': 'http://{{ default "ship-manager-backend" .Values.backend.ingress.hostname }}.{{ .Values.global.dnsZone }}', 'VUE_APP_PROJECT_VERSION': '{{ .Values.global.imageTag }}' } })()Notice I’m pulling everything from .Values, this is the values.yaml file we’ll see shortly. Notice too that most of the things that can be changed and that need to be changed, like the image name, the tag, the hostname and the database, are also variables.
In cases like these, using configmaps and secrets helps a lot to keep the pipeline simple.
The final file will be:
apiVersion: apps/v1kind: Deploymentmetadata: name: ship-manager-frontendspec: replicas: 1 selector: matchLabels: app: ship-manager-frontend template: metadata: labels: app: ship-manager-frontend spec: containers: - image: {{ required "Registry is required" .Values.global.registryName }}/{{ required "Image name is required" .Values.frontend.imageName }}:{{ required "Image tag is required" .Values.global.imageTag }} name: ship-manager-frontend resources: requests: cpu: 100m memory: 128Mi limits: cpu: 250m memory: 256Mi ports: - containerPort: 8080 name: http volumeMounts: - name: config mountPath: /usr/src/app/dist/config.js subPath: config.js volumes: - name: config configMap: name: frontend-config---apiVersion: v1kind: Servicemetadata: name: ship-manager-frontendspec: selector: app: ship-manager-frontend ports: - name: http port: 80 targetPort: 8080---apiVersion: networking.k8s.io/v1beta1kind: Ingressmetadata: name: ship-manager-frontend annotations: kubernetes.io/ingress.class: addon-http-application-routingspec: rules: - host: {{ default "ship-manager-frontend" .Values.frontend.ingress.hostname }}.{{ .Values.global.dnsZone }} http: paths: - path: / backend: serviceName: ship-manager-frontend servicePort: http---apiVersion: v1kind: ConfigMapmetadata: name: frontend-configdata: config.js: | const config = (() => { return { 'VUE_APP_BACKEND_BASE_URL': 'http://{{ default "ship-manager-backend" .Values.backend.ingress.hostname }}.{{ .Values.global.dnsZone }}', 'VUE_APP_PROJECT_VERSION': '{{ .Values.global.imageTag }}' } })()Let’s do the same with the backend, creating a backend.yaml file in the charts/backend/templates folder:
apiVersion: apps/v1kind: Deploymentmetadata: name: ship-manager-backendspec: replicas: 1 selector: matchLabels: app: ship-manager-backend template: metadata: labels: app: ship-manager-backend spec: containers: - image: {{ required "Registry is required" .Values.global.registryName }}/{{ required "Image name is required" .Values.imageName }}:{{ required "Image tag is required" .Values.global.imageTag }} name: ship-manager-backend resources: requests: cpu: 100m memory: 128Mi limits: cpu: 250m memory: 256Mi ports: - containerPort: 3000 name: http env: - name: DATABASE_MONGODB_URI valueFrom: secretKeyRef: key: database_mongodb_uri name: backend-db - name: DATABASE_MONGODB_DBNAME value: {{ default "ship-manager" .Values.global.dbName }}---apiVersion: v1kind: Servicemetadata: name: ship-manager-backendspec: selector: app: ship-manager-backend ports: - name: http port: 80 targetPort: 3000---apiVersion: networking.k8s.io/v1beta1kind: Ingressmetadata: name: ship-manager-backend annotations: kubernetes.io/ingress.class: addon-http-application-routingspec: rules: - host: {{ default "ship-manager-backend" .Values.ingress.hostname }}.{{ .Values.global.dnsZone }} http: paths: - path: / backend: serviceName: ship-manager-backend servicePort: http---apiVersion: v1kind: Secretmetadata: name: backend-dbtype: OpaquestringData: database_mongodb_uri: {{ required "DB Connection is required" .Values.global.dbConn | quote }}Notice I have a few functions in there too, like required, default and quote. These are native Helm functions and they save the day when we need more complex behavior.
The values file#
Just like the charts, the values.yaml file is based on a hierarchy of scopes, that is, take our structure as an example:
global: chave: # Acessível a todos os charts, tanto o frontend como o backend como `.Values.global.chave`
backend: chave: # Acessível somente ao frontend e ao backend, porém para o frontend será `.Values.backend.chave` e o backend usará como `.Values.chave`
frontend: chave: # Acessível pelo frontend como `.Values.frontend.chave`, mas não pelo backend
chave: # Acessível somente ao frontend como `.Values.chave`Notice we have a scope break inside the values file. The keys that have the same name as their dependent charts will be accessed only by them and by the higher order charts, so since our frontend is the highest order chart, it has access to all the values, while the backend only has access to the keys defined under backend:.
Notice too that inside backend the scope goes through a “levelling”, that is, the scope is removed from inside backend so you don’t need to access the value as .Values.backend.chave if you’re inside the backend chart, but only as .Values.chave.
Our values file needs to have the same keys we defined inside our templates, so they’ll be these:
global: registryName: imageTag: dbName: ship-manager dbConn: dnsZone:
backend: imageName: ship-manager-backend ingress: hostname:
frontend: imageName: ship-manager-frontend ingress: hostname:The keys I’m leaving blank are the ones that will either be filled in by the CLI or by the default functions.
Creating the pipeline#
To create the pipeline, we’re going to use the manual creation mode, that is, we’re going to create a .github folder and inside it a workflows folder. The first workflow will be the simplest one, production.
Inside the workflows folder let’s create a deploy-production.yml file (it can be any name, actually) and start by writing our pipeline’s name and which triggers are going to make it run.
name: Build and push the tagged build to production
on: push: tags: - 'v*'Here we’re saying our action will run on every push with a v* tag, that is, v1.0.0 and even vabc. If you want to narrow down the possibilities you can use regex like v[0-9]\.[0-9]\.[0-9].
Then, let’s create our first job and define a shared variable:
name: Build and push the tagged build to production
on: push: tags: - 'v*'
env: IMAGE_NAME: ship-manager
jobs: build_push_image: runs-on: ubuntu-20.04We created a job called build_push_image that’s going to run on ubuntu 20, and a shared variable that will be the image’s base name. Now let’s get to the real action, let’s start creating the steps of our job, starting with two very important ones:
name: Build and push the tagged build to production
on: push: tags: - 'v*'
env: IMAGE_NAME: ship-manager
jobs: build_push_image: runs-on: ubuntu-20.04
steps: - uses: actions/checkout@v2
- name: Set env id: tags run: echo tag=${GITHUB_REF#refs/tags/} >> $GITHUB_ENVThe first step is a checkout of our repository, it’s present in pretty much every action and it’s always the first step. The second is defining a second variable, the tag name.
By default $GITHUB_REF is either the branch name or the tag name, like /refs/heads/main or /refs/tags/v1.0.0. We have to remove the /refs/* and keep only the end, that’s why we’re using a shell substitution to add it to the global variables, but this variable only works inside this job.
Now let’s do the Docker pipeline, that is, build and push of the backend and frontend images.
name: Build and push the tagged build to production
on: push: tags: - 'v*'
env: IMAGE_NAME: ship-manager
jobs: build_push_image: runs-on: ubuntu-20.04
steps: - uses: actions/checkout@v2
- name: Set env id: tags run: echo tag=${GITHUB_REF#refs/tags/} >> $GITHUB_ENV
- name: Set up Buildx uses: docker/setup-buildx-action@v1
- name: Login to ACR uses: docker/login-action@v1 with: # Username used to log in to a Docker registry. If not set then no login will occur username: ${{secrets.ACR_LOGIN }} # Password or personal access token used to log in to a Docker registry. If not set then no login will occur password: ${{secrets.ACR_PASSWORD }} # Server address of Docker registry. If not set then will default to Docker Hub registry: ${{ secrets.ACR_NAME }}
- name: Build and push frontend image uses: docker/build-push-action@v2 with: # Docker repository to tag the image with tags: ${{secrets.ACR_NAME}}/${{ env.IMAGE_NAME }}-frontend:latest,${{secrets.ACR_NAME}}/${{ env.IMAGE_NAME }}-frontend:${{env.tag}} labels: | image.revision=${{github.sha}} image.release=${{github.ref}} file: frontend/Dockerfile context: frontend push: true
- name: Build and push backend image uses: docker/build-push-action@v2 with: # Docker repository to tag the image with tags: ${{secrets.ACR_NAME}}/${{ env.IMAGE_NAME }}-backend:latest,${{secrets.ACR_NAME}}/${{ env.IMAGE_NAME }}-backend:${{env.tag}} labels: | image.revision=${{github.sha}} image.release=${{github.ref}} file: backend/Dockerfile context: backend push: trueDocker has 3 actions in use here. The first of them is the setup of buildx, Docker’s image build utility, the second is the login to a registry, in this case our ACR, and here we have our first secret that we’re going to create inside our repository, which will be the ACR login data.
Finally, we’re building and pushing the image and creating the latest tag and the GitHub tag name, this way we know which images are the “production” ones and which will be the test ones. We also add two labels to each image, one of them has the revision, our commit’s sha, and the other the tag name.
With that we finish our first job. The second is the part where we’re going to deploy to the cluster. The beginning is the same so I’m going to omit the content up to this point so we can focus only on this part:
# inicio do arquivojobs: build_push_image: # job de envio da imagem
deploy: runs-on: ubuntu-20.04 needs: build_push_image
steps: - uses: actions/checkout@v2
- name: Set env id: tags run: echo tag=${GITHUB_REF#refs/tags/} >> $GITHUB_ENV
- name: Install Helm uses: Azure/setup-helm@v1 with: version: v3.3.1Notice we’re creating a relation between the two jobs with the needs key, this says the second job will only run if the first one passes. We do the checkout and copy the variable creation, then we run a simple step to install Helm on the machine.
# inicio do arquivojobs: build_push_image: # job de envio da imagem
deploy: runs-on: ubuntu-20.04 needs: build_push_image
steps: - uses: actions/checkout@v2
- name: Set env id: tags run: echo tag=${GITHUB_REF#refs/tags/} >> $GITHUB_ENV
- name: Install Helm uses: Azure/setup-helm@v1 with: version: v3.3.1
- name: Get AKS Credentials uses: Azure/aks-set-context@v1 with: creds: ${{ secrets.AZURE_CREDENTIALS }} # Resource group name resource-group: ship-manager-pipeline # AKS cluster name cluster-name: ship-manager
- name: Run Helm Deploy run: | helm upgrade \ ship-manager-prd \ ./kubernetes/ship-manager \ --install \ --create-namespace \ --namespace production \ --set global.registryName=${{ secrets.ACR_NAME }} \ --set global.dbConn="${{ secrets.DB_CONNECTION }}" \ --set global.dnsZone=${{ secrets.DNS_NAME }} \ --set global.imageTag=${{env.tag}}Finally we’ll have the command to get the Kubernetes credentials and the Helm deploy. Notice we’re deploying to a production namespace and setting the values.yaml values through the --set flags, this makes everything easier when we need to remove the data, because we only need to remove the namespace and everything gets deleted.
The test pipeline is almost identical, the difference is that we’re setting more variables and we changed the publishing namespace and the trigger too. The other file, which I called deploy-test, ended up like this:
name: Build and push the tagged build to test
on: push: branches-ignore: - 'main' - 'master'
env: IMAGE_NAME: ship-manager
jobs: build_push_image: runs-on: ubuntu-20.04
steps: - uses: actions/checkout@v2
- name: Set env id: tags run: echo tag=${GITHUB_REF#refs/heads/} >> $GITHUB_ENV
- name: Set up Buildx uses: docker/setup-buildx-action@v1
- name: Login to ACR uses: docker/login-action@v1 with: # Username used to log in to a Docker registry. If not set then no login will occur username: ${{secrets.ACR_LOGIN }} # Password or personal access token used to log in to a Docker registry. If not set then no login will occur password: ${{secrets.ACR_PASSWORD }} # Server address of Docker registry. If not set then will default to Docker Hub registry: ${{ secrets.ACR_NAME }}
- name: Build and push frontend image uses: docker/build-push-action@v2 with: # Docker repository to tag the image with tags: ${{ secrets.ACR_NAME }}/${{ env.IMAGE_NAME }}-frontend:${{env.tag}} labels: | image.revision=${{github.sha}} file: frontend/Dockerfile context: frontend push: true
- name: Build and push backend image uses: docker/build-push-action@v2 with: # Docker repository to tag the image with tags: ${{ secrets.ACR_NAME }}/${{ env.IMAGE_NAME }}-backend:${{env.tag}} labels: | image.revision=${{github.sha}} file: backend/Dockerfile context: backend push: true
deploy: runs-on: ubuntu-20.04 needs: build_push_image
steps: - uses: actions/checkout@v2
- name: Set env id: tags run: echo tag=${GITHUB_REF#refs/tags/} >> $GITHUB_ENV
- name: Install Helm uses: Azure/setup-helm@v1 with: version: v3.3.1
- name: Get AKS Credentials uses: Azure/aks-set-context@v1 with: creds: ${{ secrets.AZURE_CREDENTIALS }} # Resource group name resource-group: ship-manager-pipeline # AKS cluster name cluster-name: ship-manager
- name: Run Helm Deploy run: | helm upgrade \ ship-manager-${{env.tag}} \ ./kubernetes/ship-manager \ --install \ --create-namespace \ --namespace test-${{env.tag}} \ --set global.registryName=${{ secrets.ACR_NAME }} \ --set global.dbConn="${{ secrets.DB_CONNECTION }}" \ --set global.dbName=ship-manager-test-${{env.tag}} \ --set global.dnsZone=${{ secrets.DNS_NAME }} \ --set backend.ingress.hostname=ship-manager-backend-${{env.tag}} \ --set frontend.ingress.hostname=ship-manager-frontend-${{env.tag}} \ --set global.imageTag=${{env.tag}}Secrets#
Now that we have the pipelines created, let’s go to GitHub to create our secrets! Open the repository in your browser, go to the Settings tab and then secrets, then click New repository secret to create a new local secret.
Let’s create a secret called ACR_LOGIN which will be the name of our ACR, that is, shipmanager. Another one called ACR_NAME, which isn’t really a secret, because it’s our CR’s DNS, but this way we avoid having a hardcoded value in our action. This value is shipmanager.azurecr.io.
The ACR password can be obtained with an AZ CLI command: az acr credential show -n shipmanager --query "passwords[0].value" -o tsv and should be put into another secret called ACR_PASSWORD.
To get our AKS key, we’re going to need service principal access on Azure, which can be obtained with the command az ad sp create-for-rbac --sdk-auth. This command will give you back a JSON, copy the whole JSON and paste it into the secret called AZURE_CREDENTIALS.
The database connection for the secret called DB_CONNECTION can also be obtained with the command az cosmosdb keys list -n ship-manager-db -g ship-manager-pipeline --type connection-strings --query "connectionStrings[0].connectionString".
And the final secret can be obtained through a query on the AKS enabled addons list. Since we turned on HTTP Application Routing, we’ll have a DNS zone available that we can get with the command az aks show -n ship-manager -g ship-manager-pipeline --query "addonProfiles.httpApplicationRouting.config.HTTPApplicationRoutingZoneName and put into the secret called DNS_NAME.
Testing#
We commit our changes and now let’s create a tag with git tag -a v<version> -m'new version and then git push --tags so we can trigger our build. We’ll have a small delay and then an output like this:
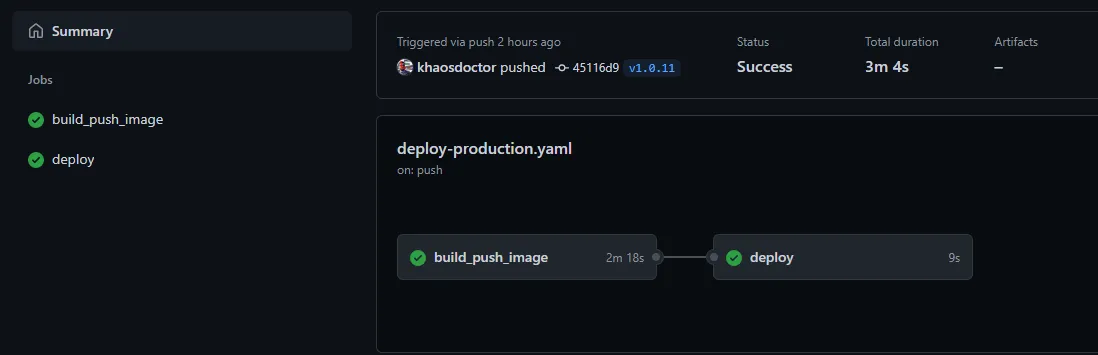
If we look at our application after a few minutes (DNS takes a while to propagate), we’ll see we have an address just like our ingress’s (we can get the frontend address with kubectl get ing -n production). When we access it, we’ll have our application running:

Our application is on a production branch and will be accessible and updated to the newest version whenever we push with a specific tag. The same will happen when we create a new branch and push, try creating any branch and sending some code!
Conclusion and improvements#
Creating a dynamic environment isn’t simple, but it can be the difference between a team that takes forever to test its features and a team that can be much more efficient. In this example we got to 50% of what’s needed, the other important part of the pipeline is also removing your resources whenever they’re no longer in use.
For this reason, using another database instead of the same instance is much more preferable. Ideally we’d create a dependency in the backend chart pointing to a completely empty MongoDB chart, this way we can be sure this environment is totally isolated and we can remove the whole environment without any problem.
Leave your comments and maybe we can continue this series!
Footnotes#
-
We could create the helm chart automatically via CLI, but it creates several files we don’t need, so we’re going to create it manually to keep things easier. ↩
-
It’s possible to have more values files inside the dependent charts and the rule stays the same, the difference is that the higher order chart will be changed, but this pattern makes maintenance quite complex. ↩
-
We can’t define the variable inside
envbecause that key doesn’t run any kind of shell, so we can’t use value substitution or expansions. ↩ -
Both pieces of information can be obtained in the Azure portal. Knowing the ACR name, the login is the same and the DNS is always
<name>.azurecr.io↩